My Visitors
Subscribe Here


Friday, August 12, 2011
Kitties in my Garden PTU tut
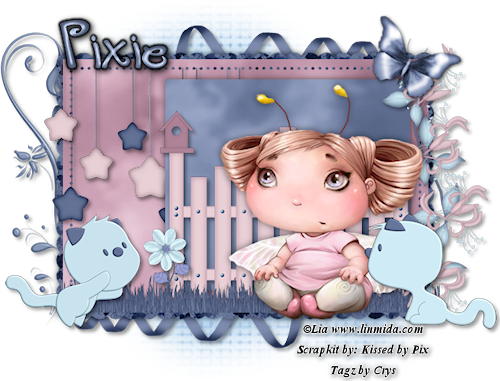
To make this adorable siggy, please follow the directions below!
For this tutorial you will need the following:
Scrap kit: PTU kit Kitties in my Garden by kissed by Pix HERE
Template: Missy template #29 HERE
Tube: tube of choice, I am using the adorable art work of Lia
Font Used: Tingle Institute
Mask of choice
♥ Let's Get started! ♥
Open template, image, canvas size 600x600
For the drop shadow on evertying I am using the following settings:
Verticle: 2, Horizontal: 2, Opacity: 54, Blur: 6, color black. (you use what ever you want)
Remember to save as you go.
(*Resize everything before you start copy and pasting)
Paper 1 (resize 54%)
Sky Paper 1 (resize 66%)
Sky Paper 2 (resize 66%)
Floral Paper 3 (resize 66%)
Blue Grass (resize 68%)
Doodle 2 (resize 67%)
Fence (resize 56%)
Flutter 4 (resize 18%)
Kitty 3 (resize 28%)
Kitty 8 (resize 28%)
Ribbon 6 (resize 68%)
Star Mobile (do not resize)
Summer flower 3 (resize 16%)
Vine (resize 60%)
Tube (if using the same tube resize 68%)
You can always refer to the sample for placement of anything!
Delete the copyright, brush by Ivy, and the background.
Select the the scalloped edge layer, selections, float, defloat, invert.
Copy and paste floral paper 3, hit delete on the keyboard. Selections, select none.
Delete the black scalloped edge layer.
Make sure you add your dropshadow to everthing as you went.
Select large rectangle layer, selections, float, defloat, invert, copy and paste sky paper 2
Hit delete. Selections, select none and delete the grey rectangle.
Select the smaller rectangle, selections, float, defloat, invert, copy and paste sky paper 1,
hit delete. Selections, select none and delete the smaller grey rectangle.
Copy and paste paper 1, layers, load/save mask, add your mask, right click on the mask layer
and merge group. Now you can resize or move around if needed.
copy and paste ribbon 6 drag to bottom layer just above the mask in the bottom left corner.
Duplicate, mirror and adjust to the top right side. See example.
copy and paste the doodle 2. Mirror and using your pick tool, straiten it out some.
copy and paste the star mobile. using your selection tool set on rectangle, select the top
part of the mobile (Large star) and delete it, leaveing the strings and the stars. See sample
for placement. Remember to add dropshadow as you go. Copy and paste the vine, using the pick
tool straighten it out and move to the right side of the template on top layer.
Copy and paste the fence, adjusting inside the smaller rectangle. Copy and paste flutter 4
using the pick tool again, turn it to the right a bit. Position to top right above the vine.
copy and paste blue grass, aranging on top of the fence to strech the entire length of larger
rectangle. Copy and paste summer flower setting just on top of left fence post.
Copy and paste kitty 8, mirror and place at the bottom left corner. Copy and paste kitty 3,
mirror and move to the bottom right corner.
Copy and paste the tube and drag just below kitty 3 layer. Add your dropshadows.
Crop and resize to your liking, I resized to 500. Make sure DPI is 72.
Add your name. I added an effect to the name. If you want to use the same effect, then follow the
next steps...
Effects, 3D Effects, inner bevel on these settings:
Width 24, Smoothness 40, Depth 16, Ambience -27, Shininess 46, Angle 135, Intensity 30
Elevation 88, using white. Click ok, then I added a gradient glow with the color black.
Add your dropshadow. Add your copyrights for the tube.
Merge visible and save! you're done! Simple and easy.
I would love to see what you made!
Thank you for following my tutorial! If you have any questions please email me at
kissnjoe@yahoo.com!

Subscribe to:
Post Comments (Atom)
About Me
- Crys
- I am a SAHM of 2 very active kids and a Wife to a wonderful man. I also take care of my grandma who lives with us...so yep I am a busy girl...lol, I started out as a tagger almost 4 yrs ago and then I started making templates and writing tutorials, one day I decided I wanted to try my hand at making scrap kits...and almost 2 years later, I am still making them. I have met a lot of amazing people along the way that have helped and given me support through-out all of this. Big hugs and thanks! Well that is about it, if you want to know more...just shoot me an email!
My Scrap Blog

Snag My Blinkie

0 comments: