My Visitors
Subscribe Here


Saturday, May 29, 2010
PTU Tutorial - Slumber Party
For this tutorial you will need the following:
Scrap Kit: PTU kit Girls Just Wanna Have Fun by Kara @ Sweet Craving Scraps HERE
My Supplies HERE
Plug-ins: (Optional)
Eyecandy 4000: Gradient glow
Font Used: LDJ Jilly Nilly
♥ Let's Get started! ♥
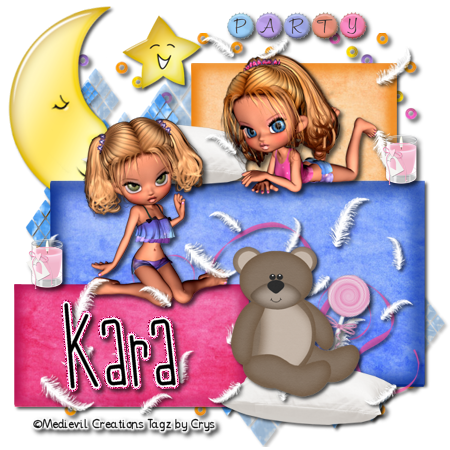
In Psp Open the slumber party template from my supplies,
For the drop shadow on evertying I am using the following settings:
Verticle: 3, Horizontal: 3, Opacity: 70, Blur: 6, color black. (you use what ever you want)
(*Resize everything before you start copy and pasting)
Open your scrap kit and select:
Papers 1, 3, & 4 (resize 68%)
Bead splatter (resize 64%)
Candle 1 (resize 12%)
Floating Feathers (resize 68%)
Happy Star (resize 26%)
lollipop 1 (resize 18%)
Maze Effect 4 (resize 48%)
Pillow 1 (resize 40%)
Ribbon 3 (resize 48%)
Sleeping Moon (resize 54%)
Teddy Bear 1 (resize 40%)
Word art 4 (resize 18%)
Blynkyn (cookie) (resize 28%)
Wynkyn (cookie) (resize 34%)
Copy and paste the bead splatter, drag below the template. Copy and paste the maze element
and arange above the bead layer, but under the template. Move to the top left corner (see
the sample for placement) Duplicate and move to the lower right corner of the tempalte.
In the layers palatte, select the long rectangle on the bottom, Selections, select all, float,
defloat, invert, copy and paste paper#1 (orange), hit delete on keyboard. Selections,
invert, over the orange layer in the layer palatte, right click, new raster layer. Flood
fill with a darker orange color, with the move tool, move the dark orange rectangle up and
to the right, click delete. (It will leave just a thin boarder of dark orange) Move it back
into the rectangle and then click adjust blur, gaussian blur on 4. Again over the orange layer in the
layer palatte, Right click, new raster layer. Flood fill with the same darker orange color,
with the move tool, move the dark orange rectangle down and to the left, click delete.
(It will leave just a thin boarder of dark orange) Move it back into the rectangle and then
click adjust blur, gaussian blur on 4.
Repeat all of the steps above with the middle rectangle, using paper #4 (blue).
Repeat all of the same steps as above with the top rectangle, using paper #3 (pink).
Compare with the example.
Copy and paste the moon, Drag it down below the template, image, free rotate, to the left,
18%. Adjust to your liking. copy and paste
the star to the right of the moon. Copy the party word art, and place it above the template,
Copy and paste Cookie blynkyn and mirror, adust her on the middle rectangle. Copy and paste
pillow, arange the pillow to the left of the cookie beside her. Duplicate the pillow and drag
it to the bottom in front of all the rectangles. Copy and paste cookie wynkyn and place her on
the smallest rectangle in front (see example for placement). Copy and paste the feathers.
Erase some of the feathers so they are only in certain spots. (see example)
Copy and paste the teddy bear and arrange it on top of the pillow, making him look
like he is leaning against the bottom rectangle. Copy and paste the ribbon and move it
behind the teddy bear and rectangle. Copy the lollipop and place it behind the teddy bear,
image, free rotate, to the right, 18%. Copy and paste the candle position next to the cookie
wynkyn and duplicate, drag up to place beside blynkyn. (See example for placement).
Add your drop shadow to everything. Resize to your liking. I resized mine for Cafemom size
(450). Add your copyright, if using the cookies provided in the kit, please use @Medievil
Creations. Add the name you want. If you want it to look like the example, then you would
add a gradient glow to it with these settings:
Glow Width 3
Soft Corners 25%
Overall Opacity 100
Color: White & a pink from the paper. Click ok. And you are done!
Thank you for following my tutorial! I hope you had fun! I would love to see anything you
make, just send it to me in an email and I will added it to my slide show!
Here is the same siggy with different tubes. Just to show you can use different tubes!
Scrap Kit: PTU kit Girls Just Wanna Have Fun by Kara @ Sweet Craving Scraps HERE
My Supplies HERE
Plug-ins: (Optional)
Eyecandy 4000: Gradient glow
Font Used: LDJ Jilly Nilly
♥ Let's Get started! ♥
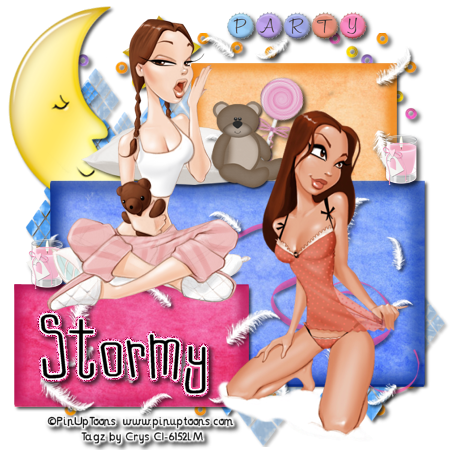
In Psp Open the slumber party template from my supplies,
For the drop shadow on evertying I am using the following settings:
Verticle: 3, Horizontal: 3, Opacity: 70, Blur: 6, color black. (you use what ever you want)
(*Resize everything before you start copy and pasting)
Open your scrap kit and select:
Papers 1, 3, & 4 (resize 68%)
Bead splatter (resize 64%)
Candle 1 (resize 12%)
Floating Feathers (resize 68%)
Happy Star (resize 26%)
lollipop 1 (resize 18%)
Maze Effect 4 (resize 48%)
Pillow 1 (resize 40%)
Ribbon 3 (resize 48%)
Sleeping Moon (resize 54%)
Teddy Bear 1 (resize 40%)
Word art 4 (resize 18%)
Blynkyn (cookie) (resize 28%)
Wynkyn (cookie) (resize 34%)
Copy and paste the bead splatter, drag below the template. Copy and paste the maze element
and arange above the bead layer, but under the template. Move to the top left corner (see
the sample for placement) Duplicate and move to the lower right corner of the tempalte.
In the layers palatte, select the long rectangle on the bottom, Selections, select all, float,
defloat, invert, copy and paste paper#1 (orange), hit delete on keyboard. Selections,
invert, over the orange layer in the layer palatte, right click, new raster layer. Flood
fill with a darker orange color, with the move tool, move the dark orange rectangle up and
to the right, click delete. (It will leave just a thin boarder of dark orange) Move it back
into the rectangle and then click adjust blur, gaussian blur on 4. Again over the orange layer in the
layer palatte, Right click, new raster layer. Flood fill with the same darker orange color,
with the move tool, move the dark orange rectangle down and to the left, click delete.
(It will leave just a thin boarder of dark orange) Move it back into the rectangle and then
click adjust blur, gaussian blur on 4.
Repeat all of the steps above with the middle rectangle, using paper #4 (blue).
Repeat all of the same steps as above with the top rectangle, using paper #3 (pink).
Compare with the example.
Copy and paste the moon, Drag it down below the template, image, free rotate, to the left,
18%. Adjust to your liking. copy and paste
the star to the right of the moon. Copy the party word art, and place it above the template,
Copy and paste Cookie blynkyn and mirror, adust her on the middle rectangle. Copy and paste
pillow, arange the pillow to the left of the cookie beside her. Duplicate the pillow and drag
it to the bottom in front of all the rectangles. Copy and paste cookie wynkyn and place her on
the smallest rectangle in front (see example for placement). Copy and paste the feathers.
Erase some of the feathers so they are only in certain spots. (see example)
Copy and paste the teddy bear and arrange it on top of the pillow, making him look
like he is leaning against the bottom rectangle. Copy and paste the ribbon and move it
behind the teddy bear and rectangle. Copy the lollipop and place it behind the teddy bear,
image, free rotate, to the right, 18%. Copy and paste the candle position next to the cookie
wynkyn and duplicate, drag up to place beside blynkyn. (See example for placement).
Add your drop shadow to everything. Resize to your liking. I resized mine for Cafemom size
(450). Add your copyright, if using the cookies provided in the kit, please use @Medievil
Creations. Add the name you want. If you want it to look like the example, then you would
add a gradient glow to it with these settings:
Glow Width 3
Soft Corners 25%
Overall Opacity 100
Color: White & a pink from the paper. Click ok. And you are done!
Thank you for following my tutorial! I hope you had fun! I would love to see anything you
make, just send it to me in an email and I will added it to my slide show!
Here is the same siggy with different tubes. Just to show you can use different tubes!

Subscribe to:
Post Comments (Atom)
About Me
- Crys
- I am a SAHM of 2 very active kids and a Wife to a wonderful man. I also take care of my grandma who lives with us...so yep I am a busy girl...lol, I started out as a tagger almost 4 yrs ago and then I started making templates and writing tutorials, one day I decided I wanted to try my hand at making scrap kits...and almost 2 years later, I am still making them. I have met a lot of amazing people along the way that have helped and given me support through-out all of this. Big hugs and thanks! Well that is about it, if you want to know more...just shoot me an email!
My Scrap Blog

Snag My Blinkie

0 comments: