My Visitors
Subscribe Here


Saturday, May 29, 2010
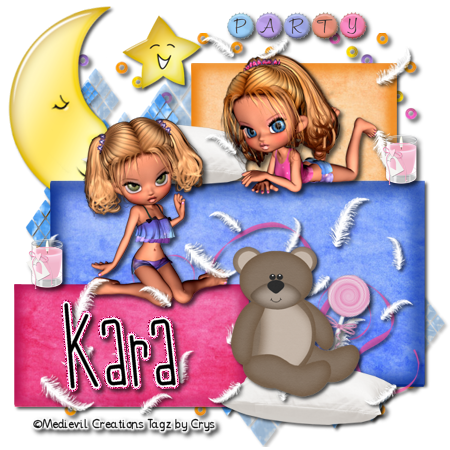
PTU Tutorial - Slumber Party
For this tutorial you will need the following:
Scrap Kit: PTU kit Girls Just Wanna Have Fun by Kara @ Sweet Craving Scraps HERE
My Supplies HERE
Plug-ins: (Optional)
Eyecandy 4000: Gradient glow
Font Used: LDJ Jilly Nilly
♥ Let's Get started! ♥
In Psp Open the slumber party template from my supplies,
For the drop shadow on evertying I am using the following settings:
Verticle: 3, Horizontal: 3, Opacity: 70, Blur: 6, color black. (you use what ever you want)
(*Resize everything before you start copy and pasting)
Open your scrap kit and select:
Papers 1, 3, & 4 (resize 68%)
Bead splatter (resize 64%)
Candle 1 (resize 12%)
Floating Feathers (resize 68%)
Happy Star (resize 26%)
lollipop 1 (resize 18%)
Maze Effect 4 (resize 48%)
Pillow 1 (resize 40%)
Ribbon 3 (resize 48%)
Sleeping Moon (resize 54%)
Teddy Bear 1 (resize 40%)
Word art 4 (resize 18%)
Blynkyn (cookie) (resize 28%)
Wynkyn (cookie) (resize 34%)
Copy and paste the bead splatter, drag below the template. Copy and paste the maze element
and arange above the bead layer, but under the template. Move to the top left corner (see
the sample for placement) Duplicate and move to the lower right corner of the tempalte.
In the layers palatte, select the long rectangle on the bottom, Selections, select all, float,
defloat, invert, copy and paste paper#1 (orange), hit delete on keyboard. Selections,
invert, over the orange layer in the layer palatte, right click, new raster layer. Flood
fill with a darker orange color, with the move tool, move the dark orange rectangle up and
to the right, click delete. (It will leave just a thin boarder of dark orange) Move it back
into the rectangle and then click adjust blur, gaussian blur on 4. Again over the orange layer in the
layer palatte, Right click, new raster layer. Flood fill with the same darker orange color,
with the move tool, move the dark orange rectangle down and to the left, click delete.
(It will leave just a thin boarder of dark orange) Move it back into the rectangle and then
click adjust blur, gaussian blur on 4.
Repeat all of the steps above with the middle rectangle, using paper #4 (blue).
Repeat all of the same steps as above with the top rectangle, using paper #3 (pink).
Compare with the example.
Copy and paste the moon, Drag it down below the template, image, free rotate, to the left,
18%. Adjust to your liking. copy and paste
the star to the right of the moon. Copy the party word art, and place it above the template,
Copy and paste Cookie blynkyn and mirror, adust her on the middle rectangle. Copy and paste
pillow, arange the pillow to the left of the cookie beside her. Duplicate the pillow and drag
it to the bottom in front of all the rectangles. Copy and paste cookie wynkyn and place her on
the smallest rectangle in front (see example for placement). Copy and paste the feathers.
Erase some of the feathers so they are only in certain spots. (see example)
Copy and paste the teddy bear and arrange it on top of the pillow, making him look
like he is leaning against the bottom rectangle. Copy and paste the ribbon and move it
behind the teddy bear and rectangle. Copy the lollipop and place it behind the teddy bear,
image, free rotate, to the right, 18%. Copy and paste the candle position next to the cookie
wynkyn and duplicate, drag up to place beside blynkyn. (See example for placement).
Add your drop shadow to everything. Resize to your liking. I resized mine for Cafemom size
(450). Add your copyright, if using the cookies provided in the kit, please use @Medievil
Creations. Add the name you want. If you want it to look like the example, then you would
add a gradient glow to it with these settings:
Glow Width 3
Soft Corners 25%
Overall Opacity 100
Color: White & a pink from the paper. Click ok. And you are done!
Thank you for following my tutorial! I hope you had fun! I would love to see anything you
make, just send it to me in an email and I will added it to my slide show!
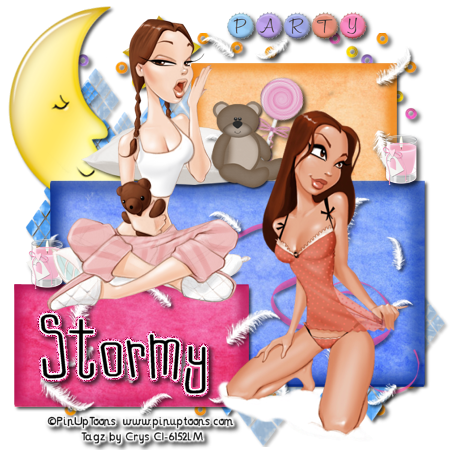
Here is the same siggy with different tubes. Just to show you can use different tubes!
Scrap Kit: PTU kit Girls Just Wanna Have Fun by Kara @ Sweet Craving Scraps HERE
My Supplies HERE
Plug-ins: (Optional)
Eyecandy 4000: Gradient glow
Font Used: LDJ Jilly Nilly
♥ Let's Get started! ♥
In Psp Open the slumber party template from my supplies,
For the drop shadow on evertying I am using the following settings:
Verticle: 3, Horizontal: 3, Opacity: 70, Blur: 6, color black. (you use what ever you want)
(*Resize everything before you start copy and pasting)
Open your scrap kit and select:
Papers 1, 3, & 4 (resize 68%)
Bead splatter (resize 64%)
Candle 1 (resize 12%)
Floating Feathers (resize 68%)
Happy Star (resize 26%)
lollipop 1 (resize 18%)
Maze Effect 4 (resize 48%)
Pillow 1 (resize 40%)
Ribbon 3 (resize 48%)
Sleeping Moon (resize 54%)
Teddy Bear 1 (resize 40%)
Word art 4 (resize 18%)
Blynkyn (cookie) (resize 28%)
Wynkyn (cookie) (resize 34%)
Copy and paste the bead splatter, drag below the template. Copy and paste the maze element
and arange above the bead layer, but under the template. Move to the top left corner (see
the sample for placement) Duplicate and move to the lower right corner of the tempalte.
In the layers palatte, select the long rectangle on the bottom, Selections, select all, float,
defloat, invert, copy and paste paper#1 (orange), hit delete on keyboard. Selections,
invert, over the orange layer in the layer palatte, right click, new raster layer. Flood
fill with a darker orange color, with the move tool, move the dark orange rectangle up and
to the right, click delete. (It will leave just a thin boarder of dark orange) Move it back
into the rectangle and then click adjust blur, gaussian blur on 4. Again over the orange layer in the
layer palatte, Right click, new raster layer. Flood fill with the same darker orange color,
with the move tool, move the dark orange rectangle down and to the left, click delete.
(It will leave just a thin boarder of dark orange) Move it back into the rectangle and then
click adjust blur, gaussian blur on 4.
Repeat all of the steps above with the middle rectangle, using paper #4 (blue).
Repeat all of the same steps as above with the top rectangle, using paper #3 (pink).
Compare with the example.
Copy and paste the moon, Drag it down below the template, image, free rotate, to the left,
18%. Adjust to your liking. copy and paste
the star to the right of the moon. Copy the party word art, and place it above the template,
Copy and paste Cookie blynkyn and mirror, adust her on the middle rectangle. Copy and paste
pillow, arange the pillow to the left of the cookie beside her. Duplicate the pillow and drag
it to the bottom in front of all the rectangles. Copy and paste cookie wynkyn and place her on
the smallest rectangle in front (see example for placement). Copy and paste the feathers.
Erase some of the feathers so they are only in certain spots. (see example)
Copy and paste the teddy bear and arrange it on top of the pillow, making him look
like he is leaning against the bottom rectangle. Copy and paste the ribbon and move it
behind the teddy bear and rectangle. Copy the lollipop and place it behind the teddy bear,
image, free rotate, to the right, 18%. Copy and paste the candle position next to the cookie
wynkyn and duplicate, drag up to place beside blynkyn. (See example for placement).
Add your drop shadow to everything. Resize to your liking. I resized mine for Cafemom size
(450). Add your copyright, if using the cookies provided in the kit, please use @Medievil
Creations. Add the name you want. If you want it to look like the example, then you would
add a gradient glow to it with these settings:
Glow Width 3
Soft Corners 25%
Overall Opacity 100
Color: White & a pink from the paper. Click ok. And you are done!
Thank you for following my tutorial! I hope you had fun! I would love to see anything you
make, just send it to me in an email and I will added it to my slide show!
Here is the same siggy with different tubes. Just to show you can use different tubes!

Friday, May 28, 2010
PTU Tutorial - A fairytale
Good Morning! I have finally gotten another tutorial done, I used the awesome scrap kit by Chassity at PolkaDot Scraps called A Fairytale. The little dragon in this kit is just adorable! For this tutorial, I decided to create a forum set. An Avi and a banner style siggy! I hope you all enjoy this tutorial! Here is the preview.
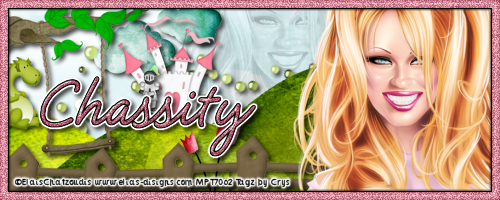 This had to be resized to fit the blog, please click on the tag to view the copyright info.
For this tutorial you will need the following:
I've used a PTU tube by Elias Chatzoudis. You can purchase his art HERE
(*Note you must have a license to use his art)
Scrap Kit: PTU kit A Fairytale by Chassity @ PolkaDot Scraps HERE
Plug-ins: (Optional)
Eyecandy 4000: Gradient glow, Glass
Xero: Radiance
Font Used: Natural Script
Pink color used: de4c6a
♥ Let's Get started! ♥
This Tutorial is for both the Avi and the Siggy, We are starting with the siggy first.
In Psp Open new layer 500x200, make sure it is on 72 DPI and trasparent is checked.
For the drop shadow on evertying I am using the following settings:
Verticle: 3, Horizontal: 3, Opacity: 70, Blur: 6, color black. (you use what ever you want)
(*Resize everything before you start copy and pasting)
Open your scrap kit and select:
E2 Castle (resize 18%)
E5 Dragon (resize 12%)
E6 Tree branch w/ swing (resize 28%)
E11 Hills (resize 70%)
E12 Clouds (resize 32%)
E13 Flowers (resize 38%)
E14 Fence (resize 78%)
E34 Beads (resize 48% & free rotate 45% to the left)
E45 Knight (resize 12%)
P 1 Sky paper
On blank layer, selections, select all, modify, contract by 8, flood fill with pink.
Effects, plugins, Eyecandy, glass with these settings:
Click on Settings Tab, click glass tube
settings should be:
Bevel width 14.40
Smoothness 100
Edge Darkness 25
Gradient shade 0
refraction 50
Opacity 80
Tinting 5
Click ok. Adjust, add noise with these settings:
Uniform checked
32%
Monochrome checked.
Effects, plugins, gradient glow at these settings:
Glow Width 3
Soft Corners 25
Overall opacity 100
click on color, use black.
copy and paste paper, move below border, copy and paste green beeds, using the sample, position
in the top middle. Copy and paste the hills, move down to bottom where just the tops
of the hills are showing. Copy and paste the clouds and position where you are happy. Copy
and paste the castle. Move it to the middle of the hill, copy and paste the knight, move
in front of the castle. Copy and paste the dragon, mirror, move to the left side on top
of the hill. Copy the tree branch/swing and paste, move the branch to just under the border
Copy and paste the flower, move to the bottom of the tag, copy and paste the fence and
move it to the bottom. Check with the sample to verify placement.
Copy the Tube and paste, Move to the right side. Effects, plugins, xero, radiance with these
settings:
Strangeness 128
Charm 50
Truth 128
Beauty 140
In layer palatte, drag one of the tubes down to the bottom and position behind the hill to
the right of the other tube. With blend mode, change to luminance (L) at 28% opacity.
Add your drop shadow to everything.
Add your Name to the siggy, if you want to do the same as I did, type the name, then use
the same glass effect as above on the border, add noise with same settings as above. For
the gradient glow, use the same settings as above, only add another slider in white. Add
your drop shadow.
Add your copy right to the tag and you are done with the siggy...Now on to the AVI...
♥ Let's Get started! ♥
In Psp Open new layer 150x150, make sure it is on 72 DPI and trasparent is checked.
For the drop shadow on evertying I am using the following settings:
Verticle: 3, Horizontal: 3, Opacity: 70, Blur: 6, color black. (you use what ever you want)
(*Resize everything before you start copy and pasting)
P1 sky paper
E11 Hills (resize 70%)
E34 Beads (resize 48% & free rotate 45% to the left)
On blank layer, selections, select all, modify, contract by 8, flood fill with pink.
Effects, plugins, Eyecandy, glass with these settings:
Click on Settings Tab, click glass tube
settings should be:
Bevel width 14.40
Smoothness 100
Edge Darkness 25
Gradient shade 0
refraction 50
Opacity 80
Tinting 5
Click ok. Adjust, add noise with these settings:
Uniform checked
32%
Monochrome checked.
Effects, plugins, gradient glow at these settings:
Glow Width 3
Soft Corners 25
Overall opacity 100
click on color, use black.
copy and paste paper, move below border, copy and paste green beeds, using the sample, position
in the top middle. Copy and paste the hills, move down to bottom where just the tops
of the hills are showing.
Copy and paste your tube, position to the right side.
Effects, plugins, xero, radiance with these
settings:
Strangeness 128
Charm 50
Truth 128
Beauty 140
Add your drop shadow to everything.
Add your initial as above,
then use
the same glass effect as above on the border, add noise with same settings as above. For
the gradient glow, use the same settings as above, only add another slider in white. Add
your drop shadow.
Add your copyright info and save!
I hope you had fun following my tutorials, if you get the time, please share. I will add
it to our slide show! Thank you for stopping by!
This had to be resized to fit the blog, please click on the tag to view the copyright info.For this tutorial you will need the following:
I've used a PTU tube by Elias Chatzoudis. You can purchase his art HERE
(*Note you must have a license to use his art)
Scrap Kit: PTU kit A Fairytale by Chassity @ PolkaDot Scraps HERE
Plug-ins: (Optional)
Eyecandy 4000: Gradient glow, Glass
Xero: Radiance
Font Used: Natural Script
Pink color used: de4c6a
♥ Let's Get started! ♥
This Tutorial is for both the Avi and the Siggy, We are starting with the siggy first.
In Psp Open new layer 500x200, make sure it is on 72 DPI and trasparent is checked.
For the drop shadow on evertying I am using the following settings:
Verticle: 3, Horizontal: 3, Opacity: 70, Blur: 6, color black. (you use what ever you want)
(*Resize everything before you start copy and pasting)
Open your scrap kit and select:
E2 Castle (resize 18%)
E5 Dragon (resize 12%)
E6 Tree branch w/ swing (resize 28%)
E11 Hills (resize 70%)
E12 Clouds (resize 32%)
E13 Flowers (resize 38%)
E14 Fence (resize 78%)
E34 Beads (resize 48% & free rotate 45% to the left)
E45 Knight (resize 12%)
P 1 Sky paper
On blank layer, selections, select all, modify, contract by 8, flood fill with pink.
Effects, plugins, Eyecandy, glass with these settings:
Click on Settings Tab, click glass tube
settings should be:
Bevel width 14.40
Smoothness 100
Edge Darkness 25
Gradient shade 0
refraction 50
Opacity 80
Tinting 5
Click ok. Adjust, add noise with these settings:
Uniform checked
32%
Monochrome checked.
Effects, plugins, gradient glow at these settings:
Glow Width 3
Soft Corners 25
Overall opacity 100
click on color, use black.
copy and paste paper, move below border, copy and paste green beeds, using the sample, position
in the top middle. Copy and paste the hills, move down to bottom where just the tops
of the hills are showing. Copy and paste the clouds and position where you are happy. Copy
and paste the castle. Move it to the middle of the hill, copy and paste the knight, move
in front of the castle. Copy and paste the dragon, mirror, move to the left side on top
of the hill. Copy the tree branch/swing and paste, move the branch to just under the border
Copy and paste the flower, move to the bottom of the tag, copy and paste the fence and
move it to the bottom. Check with the sample to verify placement.
Copy the Tube and paste, Move to the right side. Effects, plugins, xero, radiance with these
settings:
Strangeness 128
Charm 50
Truth 128
Beauty 140
In layer palatte, drag one of the tubes down to the bottom and position behind the hill to
the right of the other tube. With blend mode, change to luminance (L) at 28% opacity.
Add your drop shadow to everything.
Add your Name to the siggy, if you want to do the same as I did, type the name, then use
the same glass effect as above on the border, add noise with same settings as above. For
the gradient glow, use the same settings as above, only add another slider in white. Add
your drop shadow.
Add your copy right to the tag and you are done with the siggy...Now on to the AVI...
♥ Let's Get started! ♥
In Psp Open new layer 150x150, make sure it is on 72 DPI and trasparent is checked.
For the drop shadow on evertying I am using the following settings:
Verticle: 3, Horizontal: 3, Opacity: 70, Blur: 6, color black. (you use what ever you want)
(*Resize everything before you start copy and pasting)
P1 sky paper
E11 Hills (resize 70%)
E34 Beads (resize 48% & free rotate 45% to the left)
On blank layer, selections, select all, modify, contract by 8, flood fill with pink.
Effects, plugins, Eyecandy, glass with these settings:
Click on Settings Tab, click glass tube
settings should be:
Bevel width 14.40
Smoothness 100
Edge Darkness 25
Gradient shade 0
refraction 50
Opacity 80
Tinting 5
Click ok. Adjust, add noise with these settings:
Uniform checked
32%
Monochrome checked.
Effects, plugins, gradient glow at these settings:
Glow Width 3
Soft Corners 25
Overall opacity 100
click on color, use black.
copy and paste paper, move below border, copy and paste green beeds, using the sample, position
in the top middle. Copy and paste the hills, move down to bottom where just the tops
of the hills are showing.
Copy and paste your tube, position to the right side.
Effects, plugins, xero, radiance with these
settings:
Strangeness 128
Charm 50
Truth 128
Beauty 140
Add your drop shadow to everything.
Add your initial as above,
then use
the same glass effect as above on the border, add noise with same settings as above. For
the gradient glow, use the same settings as above, only add another slider in white. Add
your drop shadow.
Add your copyright info and save!
I hope you had fun following my tutorials, if you get the time, please share. I will add
it to our slide show! Thank you for stopping by!
Wednesday, May 19, 2010
PTU Tutorial - Who's the Frog
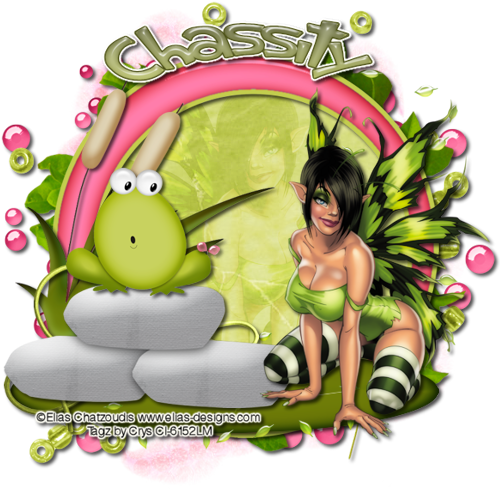
For this tutorial you will need the following:
I've used a PTU tube by Elias Chatzoudis. You can purchase his art HERE
(*Note you must have a license to use his art)
Scrap Kit: PTU kit Lilly Pad by Chassity @ PolkaDot Scraps HERE
Mask: I used mask #414 by Vix you can get it HERE
Plug-ins: (Optional)
Eyecandy 4000: Gradient glow, Glass
Xero: Porcelain, Radiance
Font Used: Shark Random Fun
♥ Let's Get started! ♥
In Psp Open new layer 600x600, make sure it is on 72 DPI and trasparent is checked.
For the drop shadow on evertying I am using the following settings:
Verticle: 3, Horizontal: 3, Opacity: 70, Blur: 6, color black. (you use what ever you want)
(*Resize everything before you start copy and pasting)
Open your scrap kit and select:
Frame 4 (resize by 78%)
Paper 11 (resize by 72%)
Paper 1
Element 2 (resize 45%)
Element 6 (flip)
Element 7 (resize 78%)
Element 10 (resize 68%)
Element 20 (resize 74%)
Element 28 (resize 52%)
Element 31 (resize 89%)
Element 39
Element 40
Copy and paste paper 11, apply vix mask 414. Copy and paste the frame, with the magic wand
click inside the frame, selections, modify, expand by 6. Selections, invert and copy and
paste paper 1, click delete on the keyboard.
Copy and paste element 39, move below frame. and arrange where you like it, same with
element 40. Copy and paste the cirlce of leaves, move below the frame.
Copy and paste the tube of choice below the frame. with the magic wand, click in the center
of the frame, selections, modify, expand by 6, selections, invert. Click on tube again and
hit delete button. (next step is optional) Effects, plugins, xero, radiance with these settings:
Strangeness 128
Charm 50
Truth 128
Beauty 255
still on the tube, in the layer palatte, blend mode, soft light, at 66%.
Copy and paste the lilly pad and arrange it at the bottom of the frame, copy and paste the
small scattered leaves, see the sample for placement on the elements. Copy and paste the
rocks, copy and paste the cattails behind the rock, now copy and paste the frog, place him
on top of the rock. Copy the ribbon and place it behind the rock, again see the sample for
details. Copy and paste the tube, mirror, arrange her to be on the right side, sitting on the
lilly pad. (next step is optional) on tube layer still, Effects, plug ins, xero, porcelain,
on these settings:
Strength 128
Softness 27, Brightness 128
Add drop shadow to all the elements and tubes. Add your copyright info. Now for adding
the text on a curve.
click on the reset shapes and select ellipse. Select the circle and draw out a circle a
little bigger than the frame. Do not convert to raster, leave as a vector. Right click
on the vector circle and add a new raster layer. With your text tool, click at the top of
the vector circle and type the name. Convert to a raster layer. Delete the vector circle
and extra raster layer. (next steps are optional)
With the font layer selected, effects, plugins, eyecandy, glass, click on settings, click on
snow, and then click ok. Next...effects, plugins, eyecandy, gradient glow, choose a dark
green and then with a second slider, move it 1/4 of the way across the bar, then move another
slider down 3/4 of the bar and make it white. Click Ok. Add your drop shadow. If you need
to, crop and resize.
There ya go, one new siggy! I hope you enjoyed the tutorial! If you do it, I would love to
see the results. Thank you!
Tuesday, May 18, 2010
FTU Tutorial ~ Buried Treasure

This tutorial is for someone with the basic knowledge of PSP
For this tutorial you will need the following:
I've used a PTU tube by Keith Garvey. You can purchase his art HERE
(*Note you must have a license to use his art)
Scrap Kit: Buried Treasure by Stormy @ Sinfully Creative Scraps HERE
Mask: I used mask #404 by Vix you can get it HERE
Plug-ins:
Eyecandy 4000: Gradient glow
Font Used: Rapscallioin
♥ Let's Get started! ♥
In Psp Open new layer 600x600, make sure it is on 72 DPI and trasparent is checked.
For the drop shadow on everything I am using the following settings:
Vertacle: 3, Horizontal: 3, Opacity: 70, Blur: 6, color black. (you use what ever you want)
Open your scrap kit and select:
Rope frame
Paper 1 resize by 78%
Paper 4 resize by 68%
Parrot resize by 40%
Net (do not resize)
Grass (do not resize)
Fence (do not resize)
Treasure Chest (resize 78%, mirror)
Reed (resize 36%, mirror)
Bar of Gold 1 (resize 36%, mirror)
Tall grass 3 (resize 36%)
Ship 2 resize (44%)
Scrolls (resize 36%, free rotate 20%)
Copy paper 4 and add mask. Copy and paste the rope frame to the 600x600 raster layer.
Erase the end of the ropes so they do not go below the bottom.
Copy paper 1 and paste behind the rope frame. Erase
any paper that appears outside the frame. See sample for detail. Next copy and paste the fence
arrange to your liking and erase any part of the fence that appears outside the frame. Paste the
grass and adjust,erasing anything outside the frame. Copy and Paste the boat just above the fence
(see sample for example) now with your eraser,
erase some bottom edges of the boat to make it look like it is actually in the water.
Copy and paste the Reed, Move it to the far left side of the fence. Arrange to above the
frame. Copy and paste the treasure chest, move to the left side, copy and paste the gold bar
and move to in front of the treasure chest. Copy and paste the parrot. Arrange on the
left side of the frame. Copy and paste tall grass, move to the right side of the frame.
Copy and paste the net and adjust on the right side of the frame. You can keep checking the
sample for placement. Copy and paste the scrolls and place over the frame on the bottom by
the treasure chest.
Copy the tube you are using and paste it to the right side adjust to look good.
Make sure you add your drop shadow to the elements and the tube.
All you have to do is add your name. If you want your text to stand out like the one I did,
after typing out the name, Convert to a raster then click on adjust add noise, with these settings:
Uniform checked, Noise at 64%, and monochrome checked.
Now if you want to use the Gradient Glow for around the text, go to effects, plug-ins,
eyecandy, gradient glow on these settings:
Glow width 3, soft corners 25, Overall opacity 100, click on color tab, with these settings:
make the first slider black and then make a second slider with black and move it 1/4 of the way out
make a third slider and make it white. Move it to the half way point and then click ok. Add
your drop shadow and your copyright info. Click on the crop tool and crop the siggy.
Now resize it to your liking then add your copyright information if needed.
I hope you enjoyed my tutorial! Thank you
Friday, May 14, 2010
PTU Tutorial - Queen of Hearts
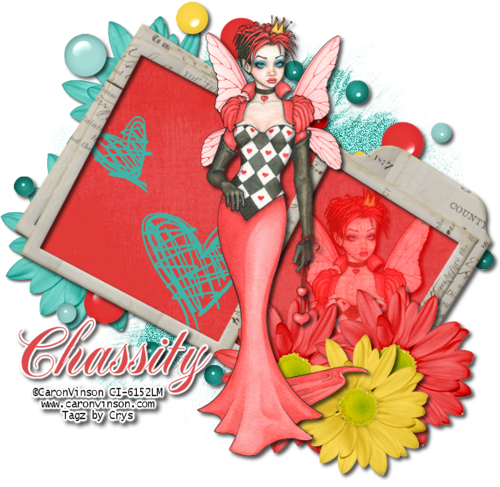
This tutorial is for someone with the basic knowledge of PSP
For this tutorial you will need the following:
I've used a PTU tube by Caron Vinson. You can purchase her art HERE
(*Note you must have a license to use her art)
Scrap Kit: Rain Drops Made by Chassity at PolkaDot Scraps you can find it HERE
Mask: I used mask #349 by Vix you can get it HERE
Plug-ins:
Eyecandy 4000: Gradient glow
Font Used: Notnorval HmkBold
♥ Let's Get started! ♥
In Psp Open new layer 600x600, make sure it is on 72 DPI and trasparent is checked.
For the drop shadow on evertying I am using the following settings:
Verticle: 3, Horizontal: 3, Opacity: 70, Blur: 6, color black. (you use what ever you want)
Open the scrap kit, and open the following elements, papers, and frame:
Paper #2
Paper #9
Frame #3
Element #19 (bubbles)
Element #20 (scribble hearts)
Element #46, 47, & 48 (flowers)
With the hand tool, copy and paste paper #9, Go to layers, load save mask, find your mask and apply,
merge as group. Resize 78%. Adjust, add noise with these settings:
Uniform checked, 63, MOnochrome checked.
Copy and paste the frame layer above the mask. Resize by 82%, image, free rotate
to the right by 36. Copy paper 2, paste it below the frame layer.
with the magic wand on the frame layer, click inside both the frame openings,
selections, modify, expand by 4. Selections, invert. click on paper 2 layer and hit delete.
Now you have nothing outside the frame.
Copy and paste element #19 resize by 78% arange to the left side of the frame
(see the example for placement) Duplicate, flip, and mirror. Arrange to your liking.
Copy and paste element #46 resize by 72% position under the bubble layer, duplicate readjust.
see the sample for placement.
Copy and paste element #47. Resize by 64% organize at the bottom right corner of the frame.
Duplicate and move just beside the first one.
Copy and paste element # 48, resize by 56%. position on top of the red flowers.
copy and paste scribble hearts, resize by 78%, drag below the frame layer. See the sample
for positioning.
Copy the tube and position on top, duplicate and drag below the frame layer. With the magic
wand on the frame layer, click in the box on the right, selections, modify, expand by 4.
Selections invert. Click on the tube layer (below the frame) hit delete. On the same tube
layer, effects, xero, radiance on these settings:
Strangeness 128
Charm 50
Truth 128
Beauty 112
click ok. still on the tube layer with blend mode, use Overlay.
Add your drop shadow to everything.
Now for the name. You can use what ever font you like, I used a color from the tube for the
name. On the name I used eyecandy Gradient glow on these settings:
Glow width 3
soft corners 25
overall opacity 100
Color white
add another bar and drag it half way across, click ok. Add your drop shadow.
Add your copyright and resize to your liking!
Thank you for following my tutorial! I would love to see anything you made.
Subscribe to:
Posts (Atom)
About Me
- Crys
- I am a SAHM of 2 very active kids and a Wife to a wonderful man. I also take care of my grandma who lives with us...so yep I am a busy girl...lol, I started out as a tagger almost 4 yrs ago and then I started making templates and writing tutorials, one day I decided I wanted to try my hand at making scrap kits...and almost 2 years later, I am still making them. I have met a lot of amazing people along the way that have helped and given me support through-out all of this. Big hugs and thanks! Well that is about it, if you want to know more...just shoot me an email!
My Scrap Blog

Snag My Blinkie
