My Visitors
Subscribe Here


Thursday, April 22, 2010
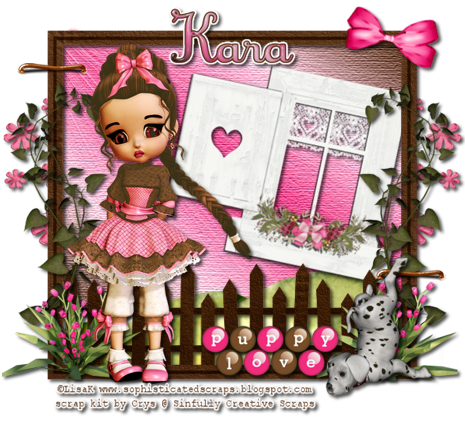
Puppy Love Tutorial
This tutorial is for someone with the basic knowledge of PSP
For this tutorial you will need the following:
Tube -- Included in the kit copyright is ©Lisa K www.sophisticatedscraps.blogspot.com
Plug-ins:
Eyecandy 4000: Glass and gradient glow
Texture: Texturizer
Scrap Kit: Made by Me, you can find it on my scrap blog Sinfully Creative Scraps HERE
(Scroll down a bit to find it)
Font Used: Crusif for the name. Size 48
♥ Let's Get started! ♥
In Psp Open new layer 600x600, make sure it is on 72 DPI and trasparent is checked.
For the drop shadow on evertying I am using the following settings:
Verticle: 3, Horizontal: 3, Opacity: 70, Blur: 6, color black. (you use what ever you want)
Open Fence Frame, copy, and paste as a new layer. Resize 82% make sure to uncheck all layers.
With the magic wand select inside the frame (make sure to get spaces between the fences too).
Select, modify, expand by 2. New raster layer, flood fill with gradient I used with these settings:
Dark Brown #563118, Dark Pink #fb4992, and Light pink #f4d6de. Click on gradient in your color
pallate click on edit and use these settings:
Dark pink should be in the middle at 50%, light pink outside of that sitting one to the right
at 24% amd 26%. the outside will be the dark brown will be at 2% and 98%. Save it and close. Make
angle at 38, repeats 0, invert checked. click ok.
Flood fill the new raster layer and drag under the fence frame. Add the texturizer effect (you don't
have to do this step. It just makes the background look like a canvas) With these settings:
Texture: Canvas, Scaling 100, and relief 4, light direction Top, invert unchecked. Click ok.
still on the gradient, effects, Illumination effects, sunbursts on these settings:
Color white, Brightness 0, horizontal 0, verticle 0, Density 90, brightness 70, circles 30,
repeats 0 invert checked. Click ok.
Now start adding your elements. Open the kit, select the window, the girl, any puppy, the brown staple,
bright pink bow, puppy love word art (I chose the M&M one), some greenery, and the medium color
pink flower spread. the grassy hill, and the pink flower plant. Resize them as needed. I resized
the window at 76%, the staple, puppy love word art, and the puppy at 40% and so on. Make the tag
your own. To create the look I have, copy the grassy hill and place behind the frame. Erase
antyhing that is outside of the frame. Copy and paste the window. Image, free rotate 12%. adjust
where you want it. Copy and paste the greenery and duplicate, and then mirror.
Position on each side of the frame. Copy and paste the staple duplicate and position them on
each side of the frame. refer back to the preview for placement. Copy and paste the plant
duplicate and position. Copy and paste flowers 3 and drag to the bottom, position to where
you can see it to the left side of the frame between the leafs. Duplicate and mirror.
Repostion if needed. Copy and paste the girl and the puppy. Mirror the puppy and postion to
the right and move the girl to the left. copy and paste the puppy love word art and move move down
in front of the fence. Add the bow. Resize and rotate 12%. Add your drop shadow to everything.
Add your copy right to the siggy. Now before you add your name, crop to remove excess canvas.
Now with the same gradient as above, add your name, effects, plug-ins, eye candy 4000, glass, on these settings:
click on settings in glass and pick Glass tubing. Leave everything the same, change the color to
the dark pink color. Click ok. Effects, plug-ins, eyecandy 4000 gradient glow, use white and
click ok. Add drop shadow. Resize all layers to your desired size.
*Make sure you can see the copy right clearly.
Save as a PnG and you are done!

Thursday, April 15, 2010
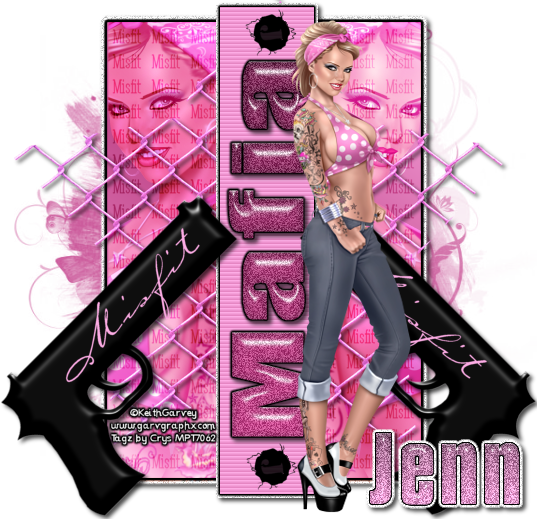
Misfit Mafia Tutorial
This tutorial is for someone with the basic knowledge of PSP
For this tutorial you will need the following:
Tube -- "Billie" by Keith Gavey which you can purchase at MPT HERE.
You MUST have a license to use this image. Please do not use it without one.
For this tutorial you will need the following:
Tube -- "Billie" by Keith Gavey which you can purchase at MPT HERE.
You MUST have a license to use this image. Please do not use it without one.
Template used: Misfit Mafia by me. You can get it HERE
Plug-ins:
Eyecandy 4000: Glass and gradient glow
Mask by Vix (mask #362) HERE
Scrap Kit Use: Made by Jamie for Creative Misfits blog train
You can get it HERE (it is Scrap kit challenge 4)
Font Used: Carpenter ICG and Mobsters
♥ Let's Get started! ♥
Open the template in PSP.
Open the tube you are going to use.
pick 2 colors that compliment each other. Here are the colors I used...
Dark Pink: #cd5c9d
light pink: #fdace5
for the gadient use these settings:
Angle 38
Repeats 1
check invert
On the bottom rectangle, select all, float, defloat, add new raster layer,
flood fill the new raster layer with the gradient. Delete grey layer
Click on the misfit words layer change blend mode, I used overlay.
from your tube, use the close up and copy and past as a new layer over the
rectangle (uncer the word art) Use what ever blend mode you like, I used luminance (L)
then adjust the opacity to what ever you think looks good. Mine is set on 39.
Duplicate the tube, adjust, mirror. reposition if you have to so it is the same as
the other side.
Click on the Rectangle layer again, Effects, Plug-Ins, Eyecandy 4000, Gradient Glow
Use these settings:
Glow Width 3.00
Soft Corners 25
Overall opacity 100
Draw only outside selection checked
Color black move a second slider almost half way across, click ok
Still on the rectangle, selections, select all, float, defloat, new raster layer,
selections, modify, expand by 4, click ok
flood fill with white, adjust, add noise with these settings:
Uniform checked, 94, monochrome checked, click ok
Add your drop shadow. Move layer under your pink rectangle layer.
click on the narrow rectangle, flood fill with the lighter pink color. Effects,
texture effects, blinds with these settings:
Width 4
Opacity 40
Color Use the Dark pink color
Horizontal and light from left/top checked
Click ok
Add same gradient glow as above. Selections, float defloat, new raster layer,
flood fill with white as before use the same noise settings, drop shadow, move
layer down one.
On the guns, (use for both guns)Effects, Plug-ins, Eyecandy 4000, Glass,
with these effects:
click on settings (in the glass pop up box) click on Snow
Settings should automatically be set at these:
Bevel width 14.40
Smoothness 100
inside marquee checked
Edge darkening 40
Gradient Shading 50
Refraction 50
Opacity 60
tinting 40
Change glass color to black (left click on the box and choose black, ok.
Click ok.
click on the word art Mafia layer
Selections, float, defloat, add a new raster layer, flood fill with
the Dark pink color
delete the black word art
Back on the mafia layer, effects, plug-ins, Eye Candy 4000, glass,
Use the same settings as the used on the guns, only use the dark pink color
instead of the black. Adjust, add noise, same settings as above, only drop the number
to 40. Effects, Eye candy 4000 Gradient Glow, use the same as above. Add your
drop shadow.
If you want to add the word misfit to the guns like I did, I used the light pink
font: Carpenter, on size 48. Type out what you want, adjust the size, click image
free rotate, click on right, type in 45, click ok. convert to a raster layer.
Do the same for the other gun, only check left in the free rotate.
Add your tube to the top layer. Add your drop shadow and adjust to where you want it.
(you may have to resize the tube some.)
at the bottom, add a new raster layer, drag to the bottom, flood fill with dark pink
color add your mask. Merge group.
Add any elements you want to use from the scrap kit, I used the star wire and recolored it
to match. Resize place where you think it looks good.
Add your name, I used the font Mobsters for the name. If you want it to look like mine,
Use the same glass effect as above and then add noise same as above. Add the gradient
glow with black, then add the same gradient glow with white. With the magic wand
click on the white area around the name so all the white is selected. Add the same noise.
selections, select none. add your drop shadow
All that is left to do is add your copyright info and resize if needed!
Thank you for following my tutorial, I would love to see anything you make!
Subscribe to:
Posts (Atom)
About Me
- Crys
- I am a SAHM of 2 very active kids and a Wife to a wonderful man. I also take care of my grandma who lives with us...so yep I am a busy girl...lol, I started out as a tagger almost 4 yrs ago and then I started making templates and writing tutorials, one day I decided I wanted to try my hand at making scrap kits...and almost 2 years later, I am still making them. I have met a lot of amazing people along the way that have helped and given me support through-out all of this. Big hugs and thanks! Well that is about it, if you want to know more...just shoot me an email!
My Scrap Blog

Snag My Blinkie
