My Visitors
Subscribe Here


Friday, July 29, 2011
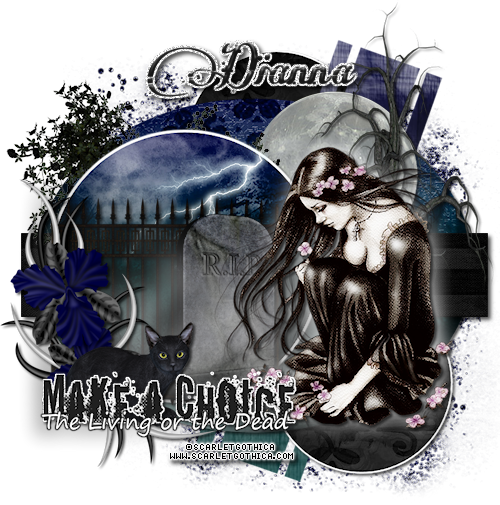
PTU Tut Make a Choice
For this tutorial you will need the following:
Scrap kit: PTU kit Stygian by Digicats(and dogs) HERE
Template: by me HERE
Tube: FTU Scarlet Gothica
She does sell some of her stuff, so if you use one of her PTU
Make sure you have a license number to do so.
She does sell some of her stuff, so if you use one of her PTU
Make sure you have a license number to do so.
Font Used: Many Weatz
♥ Let's Get started! ♥
Open template, image, canvas size 800x800
For the drop shadow on evertying I am using the following settings:
Verticle: 2, Horizontal: 2, Opacity: 70, Blur: 6, color black. (you use what ever you want)
Remember to save as you go.
(*Resize everything before you start copy and pasting)
Paper 4 (resize 58%)
Paper 9 (resize 85%)
Paper 11 do not resize
Paper 16 (resize 64%)
Paper 18 do not resize
Fence (resize 60%)
Fog (resize 78%)
Full Moon (resize 48)
Flower 2 Do not resize
Glitter Do not resize
Grave Stone 3
Lightening (resize 28%)
Rose bush 1 (resize 78%)
Stygia (resize 58%)
Tree Do not resize
Tube (resize 74%)
You can always refer to the sample for placement of anything!
Select one of the small cirles at the bottom layers, selections, float, defloat, invert.
Copy and paste paper 16, hit delete on the keyboard. Selections, select none. Delete the grey circle,
selections, float, defloat, modify by 2, add new raster layer and flood fill with white.
Drag below the circle and add dropshadow. Do the same steps with the other small cirle.
select the long rectangles in the back, selections, float, defloat, invert, copy and paste
paper 18, hit delete. Selection, select none. Delete template.
copy and paste the glitter, drag it to the bottom layer, move to the top left corner (see sample)
duplicate, and move to the bottom right corner.
On the large oval, selections, float, defloat, invert, copy and paste paper 9, hit delete.
Selections, select none, delete grey oval. Don't forget to add your dropshadow as you go.
copy and paste the Rose bush, and move to the left, just under the top cirlce layer.
On the rectangle layer above the oval,selections, float, defloat, invert, copy and paste
paper 11, hit delete. Selections, select none, delete black template.
copy and paste the full moon (adjust size to your liking) Move so it sits just under the top
cirlce layer.
Select the top circle layer, selections, float, defloat, invert, copy and paste
paper 4, hit delete. copy and paste the fence, adjust in the circle so it is more to the left
of the circle hit delete, copy and paste the lightening, adjust to the top left of the circle
and hit delete. Selections, select none, on the lightening layer, image, mirror so it sits
in the right top section of the circle.
On the circle layer again, selections, float, defloat, modify by 2, add new raster layer and
flood fill with white, Seletcions, select none. Adjust, add noise on these settings:
MOnochrome checked, Uniform checked, noise on 74%. Drag below the circle and add dropshadow.
Copy and paste the tube, adjust to the right side, copy and paste the tree, erase the roots
that stick out from under the tube. copy and paste the grave stone resize it to be a bit
smaller than the tube (see example).
copy and paste the fog, Adjust, blur, gaussian blur at 12%, Adjust to bottom.
Copy and paste flower 2, move to bottom left of top circle. Remember to add your dropshadow.
Copy and paste Stygia, move to the bottom, behind the word art.
If you want your tube to look like it has a glow behind it, then follow the next steps.
Duplicate the tube, on the bottom tube, adjust, blur, gaussian blur, 12% then change to white.
and drop the opacity to 60%.
Crop and resize to your liking, I resized to 500. Make sure DPI is 72.
Add your name. I did add a gradient glow to mine but if you do not have Eyecandy 4000, just
selections, float, defloat, modify by 2, add new raster layer and flood fill with white.
Drag below the name and add dropshadow. Add your copyrights for the tube.
Merge visible and save! you're done! Simple and easy.
I would love to see what you made!
Thank you for following my tutorial! If you have any questions please email me at
kissnjoe@yahoo.com!

Thursday, July 28, 2011
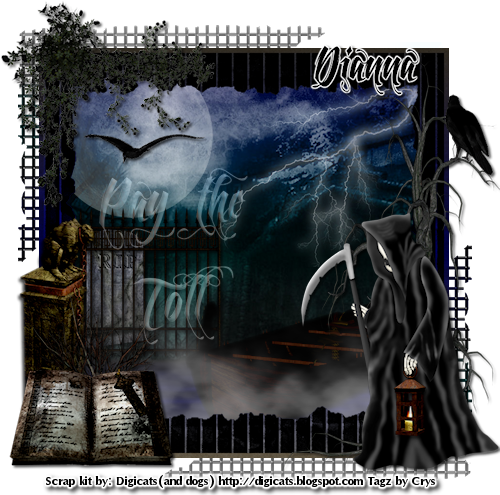
PTU Tut Pay the Toll
For this tutorial you will need the following:
Scrap kit: The Amazing PTU kit Stygian by Digicats(and dogs) HERE
Font Used: Feathergraphy Decoration
♥ Let's Get started! ♥
New raster 800x800
For the drop shadow on evertying I am using the following settings:
Verticle: 2, Horizontal: 2, Opacity: 70, Blur: 6, color black. (you use what ever you want)
Remember to save as you go.
(*Resize everything before you start copy and pasting)
Paper 4 (resize 75%)
Paper 12 (resize 75%)
Frame 2 (resize 80%)
Corner Grid (resize 60%)
Crow (resize 32%)
Crow 2 (resize 48%)
Dead Bush (resize 52%)
Fence (resize 44%)
Ferrymans Boat 2 (resize 68%)
Fog (Resize 70%)
Full Moon (resize 64%)
Gargoyle (resize 68%)
Grave Stone 3(resize 38%)
Grim Reaper (resize 54%)
Lantern (resize 32%)
Lightening (resize 44%)
Open Book (resize 64%)
Rose bush (resize 62%)
Tree (do not resize)
You can always refer to the sample for placement of anything!
Copy and paste paper 4. Copy and paste Paper 12. With the pick tool, place the cursor at the
top of the paper and drag down, keeping the width of the paper. Make it the size of the
bottom 4th of the bottom paper (making it appear water is at the bottom) Adjust, blur,
gaussian blur, radius on 2. copy and paste frame, adjusting over the papers. Add dropshadow.
copy and paste the fence, adjusting to the left side. Drag below the water paper. Copy and
paste grave stone Adjust behind the fence. Copy and paste the full moon, adjusting to the
left top corner now in the layer palette, change the blend mode to screen and drop opacity
to 37%. copy and paste the crow 2. Copy and paste the lightening, in the layer palette
Change opacity to 52, drag to layer just under the frame. Copy and paste the ferrymans boat,
adjusting to the bottom right corner. Copy and paste the fog, Move to the bottom fo cover
some of the boat, see sample for placement. Erase any of the fog on the outside of the frame.
Copy and paste the gargoyle, move to the bottom left above the frame layer.
Copy and paste the dead bush. Copy and paste the open book.
Remember to add dropshadow to everything as you go. Copy and paste the rose bush, adjust to
top left side of frame. copy and paste tree, mirror, adjust to the bottom right of the frame.
Copy and paste the grim reaper, on tree layer, erase any of the root that sicks out from the
reapers robe. Copy and paste the lantern, move to the reapers hand, and add dropshadow. Erase
the top part of the handle so it looks like the reaper is holding the lantern.
Copy and paste the Crow move to a branch of the tree. Now copy and paste the corner grid.
Adjust to the bottom right. Duplicate, image, mirror, image, flip. Adjust to the top left.
Crop and resize to your liking, I resized to 500. Make sure DPI is 72.
Now you can be done and just add your name and follow the dirctions below...but if you want
to add the word art like I did then keep following...
Pick a font, I used Feathergraphy Decoration and typed the words Pay The Toll in white.
Change blend mode to Luminance (L) and drop opacity to 43. Add dropshadow and adjust to the left.
Add your name. I did add a gradient glow to mine but if you do not have Eyecandy 4000, just
selections, float, defloat, modify by 2, add new raster layer and flood fill with white.
Drag below the name and add dropshadow. Add any copyrights ( I put who made the kit and link)
Merge visible and save! you're done! Simple and easy.
I would love to see what you made!
Thank you for following my tutorial! If you have any questions please email me at
kissnjoe@yahoo.com!
Subscribe to:
Posts (Atom)
About Me
- Crys
- I am a SAHM of 2 very active kids and a Wife to a wonderful man. I also take care of my grandma who lives with us...so yep I am a busy girl...lol, I started out as a tagger almost 4 yrs ago and then I started making templates and writing tutorials, one day I decided I wanted to try my hand at making scrap kits...and almost 2 years later, I am still making them. I have met a lot of amazing people along the way that have helped and given me support through-out all of this. Big hugs and thanks! Well that is about it, if you want to know more...just shoot me an email!
My Scrap Blog

Snag My Blinkie
