My Visitors
Subscribe Here


Wednesday, March 24, 2010
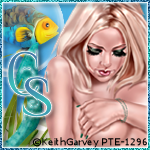
Beach Babe
Beach Babe

This tutorial is for someone with the basic knowledge of PSP
For this tutorial you will need the following:
Tube -- "Donatella" by Elias Chatzoudis which you can purchase at MPT HERE.
You MUST have a license to use this image. Please do not use it without one.
Beach Babe Template and Swirly Mask by Me HERE.
Scroll down until you find the template and masks.
Plug-ins:
Eyecandy 4000: Glass and gradient glow
Eyecandy 5 Nature: Ripple
Xero: Fritillary
Mura Miesters clouds
Font used: PeaAmiee it is a free font, you can download HERE
You will need to scroll down to find the font.
Lets get started...
Open the template in PSP, Delete the copyright. Pick your tube you are going to use the
same tube that I am using, make sure you have the proper licensing to use it.
We are going to start at the bottom, so on the right side in the layer pallate click on
raster layer 2, In the color pallate, Right click on foreground, and then click on light
grey. For the background (you can choose any color of blue), left click on the
background pallate and in the HTML box type in 86d3fc, click ok.
Click on the manual color correction (next to Enhance Photo).
Manual Target Color checked, right click on source and pick the light grey color. Right click on Target
and select the blue color. Hue on 143, Saturation on 90, and Lightness on 193
Click on ok.
Click on Effects, Eyecandy 4000, glass, click on selection, glass tube, then at the bottom
click on the blue square. click Ok.
Effects, 3D, dropshadow (you can use what ever dropshadow you want) Verticle 3, horizontal 3
Opacity 71, blur 6, color black. click ok.
In layer pallate click on the bottom circle, then up to selections, select all, float,
defloat, in the layer pallate, right click on the circle and select new raster layer. Then use
the dropper tool and take the green out of the glasses. In the background
box left click and type in the HTML box f2f7e7 this is a lighter green (you can pick your own
color) On the foreground color, click on the little black circle and change it from a solid
color to gradient and use these settings: Angle 38, Repeats 0
Click on edit. Move the bar on the dark green to the outside edges (both left and right) with
the light green in the center. Click save as and then name it, save, and click close. Click ok.
With the flood fill tool left click on the circle. Selections, select none. Click on Effects,
plugins, Eyecandy 4000 gradient glow, Glow Width move the bar all the way to the left, Soft corners
on 25, overall opacity all the way to the right. Click on color tab, left click on the color box
and change to black. Left click on first slider and drag a second one out about half way. Click ok.
Click on effects, 3D, add your dropshadow. Now delete the grey circle layer.
Click on the next circle layer above in the layer pallate. Selections, select all, float, defloat.
On the layer pallate right click on the circle layer and click new raster layer. With your
dropper tool pick up the pink color in the swim suit (or if using a different tube pick up
color out of the tube.) With the dropper tool, pick up an orange shade from the glass. On the foreground
color, click on the little black circle and change it from a solid
color to gradient and use these settings: Angle 38, Repeats 0. Click on edit. Move the foreground in towward
the center about a quarter inch do the same with the background color. In the center click just
under the bar and another tab will show up, change the custom to white. Click save as and name it.
Click close and then click ok. On the new raster layer cirlce flood fill with the new gradient. Selection,
select none, Click on Adjust,add noise, Click Uniform, Click Monochrome, move the slider to 67, click ok. Effects, Gradient glow
with the same settings as before, click on the color box and change to white. Click ok. Effects, 3D,
add dropshadow.
In the layer pallate, click on the rectangle, selections, float, defloat, back to layer pallate and
right click on the rectangle, click new raster layer. For these colors I picked a color from the hair,
and orange from the glass again. Click on gradient, flood fill. Select none. Effects, xero,
fritillary with these settings: Granularity 7, Aggression 30, Tesselation 100, variation 91, click ok
add dropshadow. Right click on grey rectangle and delete.
Left click on the top circle, selections, float, defloat, In the color pallate left click on foreground
type in the HTML box 86d3fc (or pick a blue shade of your choice). Flood fill new raster layer with
the blue, selections, select none, effects, Eyecandy Nature, ripples with these settings:
click on basic, Ripple generator, raindrops, number of rain 1, ripple wavelength 42.68, time 7.26,
random wave amplitude 0, random wave length 1.49, refraction 7, Uncheck Draw outside selection.
click ok. Effects, Eyecandy 4000, gradient glow, choose a dark blue and when you have it the way you
like it, click ok.
Click on the sun in the layer pallate, selections, select all, float, defloat, With dropper tool
pick up a lighter orange out from the slice of orange in the glass for the foreground and a darker
ornage color from the slice of orange for the background color. flood sun with foreground
color, effects, MuRas meister, clouds, click the reset colors button with the following settings:
Effect 100, amount 100, grain 3, Contrast 0, Bias 0, Light -12, Cubic 0, blur 0, contour 0, make
sure its on blend mode. click ok. Selections, select none. Effects, Eyecandy 4000, glass on these settings:
click on settings click glass tube, Bevel Width 5.39. Nothing else is changed. change the glass color box to the
foreground color. Click ok. Add drop shadow of choice. In the layer pallate delete the black
sun.
In the layer pallate click on the word art, Selections, select all, float, defloat. right click on
the word art in the layer pallate, new raster layer. In the color pallate, click on the foreground,
click on gradient, and scroll through until you find the gradient called mulit-aqua. on the settings:
Angle 38, repeats 0, invert checked, click ok. With the paint bruch tool, Paint the gradient across the word art.
Selections, select none. Effects, Eyecandy 4000, glass on these settings: Bevel width 11.37,
smoothness 75, inside marquee checked, Edge darkening 1, gradient shading 35, refraction 50,
Opacity 0, tinting 50, for the glass color, left click in the box and pick a light blue color or
a sea foam green color, click ok. Effects, Eyecandy 4000, gradient glow, use the same settings
as previously used, for the color select white. Click ok. If you want your text to look exactly
like mine then follow the next step, if you are happy with it the way it is, then add drop shadow
of your choice click ok...or with your magic wand click on just the white outline (make sure
all of the white outline is selected. Click Adjust, add noise, use these settings: Uniform checked,
monochrome checked, 89, click ok. Selcections, select none. Add your dropshadow. Right click on the black word art in the layer pallate, delete layer.
Add your tube of choice and resize to fit. I resized mine at 78%. Dropshadow of your choice.
Now you can add any other elements you would like to.
Now we are going to add your name with the font of your choice, using the gradient we used with
the word art. right click on name in layer pallate, convert to a raster layer. Effects, Eyecandy
4000, glass, use the same settings as before in the word art, click ok, Effects, Eyecandy 4000,
gradient glow, use the same as you used before with the word art. click ok. Now you can add the same
noise or leave the way it is and just add dropshadow to the name.
If you want to add a mask you need to right click in the layer pallate and add a new raster layer,
drag it to the bottom of layers flood fill with the same gardient used in the name. Click on layers,
load saved mask, load mask from disk, select your mask. click ok, right click in layer pallate on
one of the mask layers and merge group. Effects, add noise, use same settings as above in the
word art.
Resize to your liking and then add your copyright and license info
I hope you found my tutorial easy to follow and enjoyed it! I would love to see your final results!

Tuesday, March 16, 2010
Welcome!
I am so glad you have found my Tutorial Blog. I am very excited to be creating tutorials. I hope to have some up soon and I am going to try to post at least 2 a month, maybe more. If you follow one of my tutorials, I would love to see what you made, I will have a slide show to show off all the siggys made! Thank you for visiting!
Crys
Crys
Subscribe to:
Posts (Atom)
About Me
- Crys
- I am a SAHM of 2 very active kids and a Wife to a wonderful man. I also take care of my grandma who lives with us...so yep I am a busy girl...lol, I started out as a tagger almost 4 yrs ago and then I started making templates and writing tutorials, one day I decided I wanted to try my hand at making scrap kits...and almost 2 years later, I am still making them. I have met a lot of amazing people along the way that have helped and given me support through-out all of this. Big hugs and thanks! Well that is about it, if you want to know more...just shoot me an email!
My Scrap Blog

Snag My Blinkie
