My Visitors
Subscribe Here


Sunday, June 20, 2010
PTU tutorial - Beautiful Day
I am back with a new tut, I hope you all enjoy this tut, I LOVE the colors Kara used in it. Very pretty! Well here it is...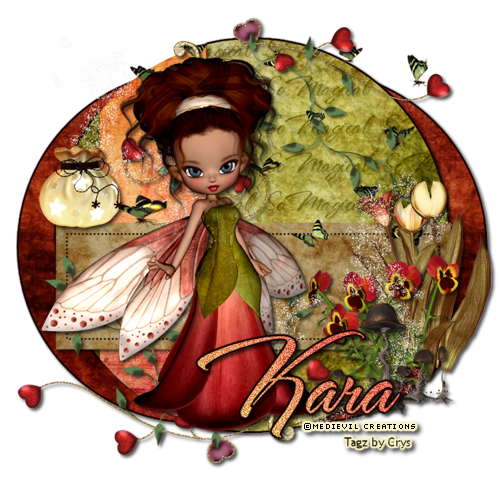 For this tutorial you will need the following:
Scrap Kit: PTU Beautiful Day by Kara HERE
(The fairy is by MediEvil and is included in the kit please read separate TOU for her cookie)
Template by Crys HERE
Plug-ins: (Optional)
Eyecandy 4000: Gradient glow
Font Used: The Nautigal
♥ Let's Get started! ♥
In Psp Open the template. Image, canvas size, change to 800. Click ok. Delete copyright
and the wordart. Delete the small rectangle and dotted line under the small rectangle.
For the drop shadow on evertying I am using the following settings:
Verticle: 3, Horizontal: 3, Opacity: 70, Blur: 6, color black. (you use what ever you want)
(*Resize everything before you start copy and pasting)
Open your scrap kit and select:
Paper 2 (resize by 70%)
Paper 3 (resize by 70%)
Paper 6 (resize by 70%)
Paper 14 (resize by 70%)
Bag (resize by 24%)
Butterfly swarm (resize 48%)
Crazy mushroom patch (resize by 28%)
Fantasy sparkles (resize by 64%)
Flower 4 (resize 33%)
Flower 5 (resize 43%)
Heart Doodle (resize by 70%)
Start at the bottom in the layer palatte, select the bottom circle, selections, select all,
float, defloat, invert, copy and paste paper 3, hit delete on the keyboard. Effects, plugins,
eyecandy 4000, gradient glow on these settings:
Glow Width: 3
Soft Corner:25
Overall opacity 100
Color Dark Brown
move a second slider half way. Click ok.
Duplicate circle, mirror, and adjust to the right side. Delete both grey circles. Add your
drop shadow to both circles.
Click on the other circle, selections, select all, float, defloat, invert, copy and paste
paper 2, hit delete on the keyboard. Now if you want to add the text in the background like I
did then you need to pick a font you like ( I used The Nautigal) on size 28. (readjust the
size to your liking), type the words you want ( I used So Magical) in black. Convert to
a raster layer. Add drop shadow. Effects, plugins, Mura's Meister Copies on these settings:
on the bottom left there is a drop down box, select tiling. Now to the center middle drop
down boxes,
Top one: line
middle: tile
bottom: (blend mode)
Sliders to the right,
Number: 1
Shift X 50
shift y 50
Scale : 100
Tile gap 2
Dont change anything else. Click ok.
Now back on the circle, selections, select all, float, defloat, invert, click back on the
words, and hit delete. Now your words should be in the same shape as the circle. Change blend
mode to Luminance (L) Opacity on 40.
Back on the Circle, Effects, plugins,eyecandy 4000, gradient glow on these settings:
Glow Width: 3
Soft Corner:25
Overall opacity 100
Color Dark Brown
move a second slider half way. Click ok. Add drop shadow.
Select the long shape that runs down the circle. Selections, select all, float, defloat, invert,
copy and paste paper 14, click delete on the keyboard. Add drop shadow, and delete the grey layer
Select the rectangle, Selections, select all, float, defloat, invert, copy and paste paper 6,
click delete on the keyboard. Add drop shadow, and delete the grey layer
Now see the example for placement of the elements. Copy and paste the bag, and move it to
the left side just above the rectangle. Add drop shadow. Copy and paste the butterfly swarm
add drop shadow, copy and paste the heart doodle, place it near the bottom left of the circle,
duplicate, flip, mirror and then place it on the top right side of the circle. Add your drop
shadow to both of the heart doodles. Copy and paste flower 5 move to the right side,
add drop shadow, copy and paste flower 4 adjust, add drop shadow. Copy and paste fantasy
sparkles adjust to your liking. Copy and paste the crazy mushroom patch, move in front of
the flowers. Copy and paste the Cookie (or your tube of choice). If using the cookies from
the kit please use this copyright... ©MediEvil Creations. Add you drop shadow.
Add your name. I took 2 colors from the cookies dress and made a gradient with it, then I used
the font The Nautigal. The next steps are optional... Ajust, add noise, with these settings:
Uniform checked
Noise: 56
Monochrome checked
Effects, plugins,eyecandy 4000, gradient glow on these settings:
Glow Width: 3
Soft Corner:25
Overall opacity 100
Color Dark Brown
move a second slider half way. Click ok. Add drop shadow.
Crop and resize. I resized mine to 500. Now add your copyright info.
Save and you are done! Simple and easy. I would love to see what you made!
Thank you for following my tutorial! If you have any questions please email me!
For this tutorial you will need the following:Scrap Kit: PTU Beautiful Day by Kara HERE
(The fairy is by MediEvil and is included in the kit please read separate TOU for her cookie)
Template by Crys HERE
Plug-ins: (Optional)
Eyecandy 4000: Gradient glow
Font Used: The Nautigal
♥ Let's Get started! ♥
In Psp Open the template. Image, canvas size, change to 800. Click ok. Delete copyright
and the wordart. Delete the small rectangle and dotted line under the small rectangle.
For the drop shadow on evertying I am using the following settings:
Verticle: 3, Horizontal: 3, Opacity: 70, Blur: 6, color black. (you use what ever you want)
(*Resize everything before you start copy and pasting)
Open your scrap kit and select:
Paper 2 (resize by 70%)
Paper 3 (resize by 70%)
Paper 6 (resize by 70%)
Paper 14 (resize by 70%)
Bag (resize by 24%)
Butterfly swarm (resize 48%)
Crazy mushroom patch (resize by 28%)
Fantasy sparkles (resize by 64%)
Flower 4 (resize 33%)
Flower 5 (resize 43%)
Heart Doodle (resize by 70%)
Start at the bottom in the layer palatte, select the bottom circle, selections, select all,
float, defloat, invert, copy and paste paper 3, hit delete on the keyboard. Effects, plugins,
eyecandy 4000, gradient glow on these settings:
Glow Width: 3
Soft Corner:25
Overall opacity 100
Color Dark Brown
move a second slider half way. Click ok.
Duplicate circle, mirror, and adjust to the right side. Delete both grey circles. Add your
drop shadow to both circles.
Click on the other circle, selections, select all, float, defloat, invert, copy and paste
paper 2, hit delete on the keyboard. Now if you want to add the text in the background like I
did then you need to pick a font you like ( I used The Nautigal) on size 28. (readjust the
size to your liking), type the words you want ( I used So Magical) in black. Convert to
a raster layer. Add drop shadow. Effects, plugins, Mura's Meister Copies on these settings:
on the bottom left there is a drop down box, select tiling. Now to the center middle drop
down boxes,
Top one: line
middle: tile
bottom: (blend mode)
Sliders to the right,
Number: 1
Shift X 50
shift y 50
Scale : 100
Tile gap 2
Dont change anything else. Click ok.
Now back on the circle, selections, select all, float, defloat, invert, click back on the
words, and hit delete. Now your words should be in the same shape as the circle. Change blend
mode to Luminance (L) Opacity on 40.
Back on the Circle, Effects, plugins,eyecandy 4000, gradient glow on these settings:
Glow Width: 3
Soft Corner:25
Overall opacity 100
Color Dark Brown
move a second slider half way. Click ok. Add drop shadow.
Select the long shape that runs down the circle. Selections, select all, float, defloat, invert,
copy and paste paper 14, click delete on the keyboard. Add drop shadow, and delete the grey layer
Select the rectangle, Selections, select all, float, defloat, invert, copy and paste paper 6,
click delete on the keyboard. Add drop shadow, and delete the grey layer
Now see the example for placement of the elements. Copy and paste the bag, and move it to
the left side just above the rectangle. Add drop shadow. Copy and paste the butterfly swarm
add drop shadow, copy and paste the heart doodle, place it near the bottom left of the circle,
duplicate, flip, mirror and then place it on the top right side of the circle. Add your drop
shadow to both of the heart doodles. Copy and paste flower 5 move to the right side,
add drop shadow, copy and paste flower 4 adjust, add drop shadow. Copy and paste fantasy
sparkles adjust to your liking. Copy and paste the crazy mushroom patch, move in front of
the flowers. Copy and paste the Cookie (or your tube of choice). If using the cookies from
the kit please use this copyright... ©MediEvil Creations. Add you drop shadow.
Add your name. I took 2 colors from the cookies dress and made a gradient with it, then I used
the font The Nautigal. The next steps are optional... Ajust, add noise, with these settings:
Uniform checked
Noise: 56
Monochrome checked
Effects, plugins,eyecandy 4000, gradient glow on these settings:
Glow Width: 3
Soft Corner:25
Overall opacity 100
Color Dark Brown
move a second slider half way. Click ok. Add drop shadow.
Crop and resize. I resized mine to 500. Now add your copyright info.
Save and you are done! Simple and easy. I would love to see what you made!
Thank you for following my tutorial! If you have any questions please email me!

Tuesday, June 15, 2010
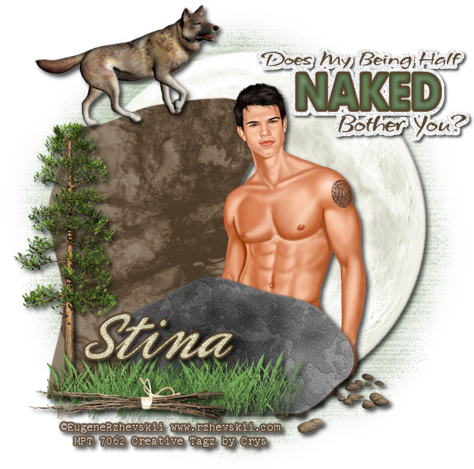
FTU Tut...Jacob's Desire
The Eclipse of the Heart Blog train has left the station! There are Amazing designers who participated! So don't forget to jump aboard the train and get all the amazing kits! Here is a tutorial with my FTU kit from the blog train...
 For this tutorial you will need the following:
I've used a PTU tube by Eugene Rzhevskii. You can purchase his art HERE
(*Note you must have a license to use his art)
Scrap Kit and Template: FTU Souls Desire (Eclipse of the Heart Blog train) by Crys HERE
Mask 119 by Weescotslass HERE
Plug-ins: (Optional)
Eyecandy 4000: Gradient glow, and glass
Eyecandy 5 rust
♥ Let's Get started! ♥
In Psp Open the template. Image, canvas size, change to 800. Click ok.
For the drop shadow on evertying I am using the following settings:
Verticle: 3, Horizontal: 3, Opacity: 70, Blur: 6, color black. (you use what ever you want)
(*Resize everything before you start copy and pasting)
Open your scrap kit and select:
Paper 1
Paper 8 (resize by 90%)
Grass
Moon 2 (resize 120%)
Pebbles
Pine Tree 2
Twigs (resize 78%)
Wolf 2 (resize 68% free rotate left 10%)
Copy and paste paper 1 and drag below the template to the bottom layer, Layers, load saved mask,
apply mask. Drop opacity to 53%.
Copy and paste the moon over the circle layer, Add drop shadow to the moon.
Delete the circle layer.
Select the cliff layer and selections, select all, float, defloat, invert, copy and paste
paper 8. Hit delete on the keyboard. Selections, select none. Delete the cliff template.
Add drop shadow to the cliff.
Copy and paste the wolf, arrange at the top of the cliff. Add drop shadow.
Copy and paste the tree, see example for placement. Add drop shadow.
Select the small rock layer, effects, plugins, Eye candy 5 nature, rust on these settings...
Under the settings tab, select Medium Orange High coverage
Under Basic tab:
Feature Size 60.01
Coverage 81
Soften spots 0
Texture variation 89
Rust color dark grey
Draw water streaks NOT checked.
Seamless tile NOT checked.
Random seed 1987
click ok.
Add your drop shadow.
Copy and paste the pebbles and drag below the small rock layer, see example for placement.
Add drop shadow.
Copy and paste the grass, arange in front of the small rock and tree. Add drop shadow.
Copy and paste the twigs, add drop shadow and see example for placement.
Copy and paste your tube of choice. Resize if need be and place where you think it looks best.
Add your drop shadow. with your move tool, drag the word art up to the top right corner.
For the word art, I took the green and the brown from the kit. click on the word art and then
click on manual color replacement. Change the color to your choice.
On the word Naked, Change it to green using the manual color replacement. Effects, plugins,
eye candy 4000, glass with these settings:
Under settings tab, select glass tube. drag the bevel width until you are satisfied with it.
click ok. effects, plugins, eye candy 4000, gradient glow with these settings:
Under basic tab:
Glow width 3
Soft corners 25
Overall opacity 100
Under the color tab:
change color to the brown move a second slider half way across. Click ok.
Hide all layers except all the word art, right click in the layers palatte on one of the
word art, merge, merge visible.
Selections, select all, float, defloat, modify, expand by 5. Add a new raster layer, flood
fill with white, adjust, add noise with these settings:
Uniform checked.
Noise 68%
Monochrome checked,
Drag below the word art and add drop shadow. Unhide everything. Add your name, I used the
cream color from the kit. Add noise on these settings:
Uniform checked.
Noise 48%
Monochrome checked.
Effects, plugins, eye candy 4000 gradient glow on these settings:
Under basic tab:
Glow width 3
Soft corners 25
Overall opacity 100
Under the color tab:
change color to the brown move a second slider half way across. Click ok. Add drop shadow.
See example on where to place the name.
Crop and resize your tag. I resized mine to 500. Now add your copyright and license number if using a PTU artist. And you are done!
Thank you for following my tutorial. I would love to see what you made!
For this tutorial you will need the following:I've used a PTU tube by Eugene Rzhevskii. You can purchase his art HERE
(*Note you must have a license to use his art)
Scrap Kit and Template: FTU Souls Desire (Eclipse of the Heart Blog train) by Crys HERE
Mask 119 by Weescotslass HERE
Plug-ins: (Optional)
Eyecandy 4000: Gradient glow, and glass
Eyecandy 5 rust
♥ Let's Get started! ♥
In Psp Open the template. Image, canvas size, change to 800. Click ok.
For the drop shadow on evertying I am using the following settings:
Verticle: 3, Horizontal: 3, Opacity: 70, Blur: 6, color black. (you use what ever you want)
(*Resize everything before you start copy and pasting)
Open your scrap kit and select:
Paper 1
Paper 8 (resize by 90%)
Grass
Moon 2 (resize 120%)
Pebbles
Pine Tree 2
Twigs (resize 78%)
Wolf 2 (resize 68% free rotate left 10%)
Copy and paste paper 1 and drag below the template to the bottom layer, Layers, load saved mask,
apply mask. Drop opacity to 53%.
Copy and paste the moon over the circle layer, Add drop shadow to the moon.
Delete the circle layer.
Select the cliff layer and selections, select all, float, defloat, invert, copy and paste
paper 8. Hit delete on the keyboard. Selections, select none. Delete the cliff template.
Add drop shadow to the cliff.
Copy and paste the wolf, arrange at the top of the cliff. Add drop shadow.
Copy and paste the tree, see example for placement. Add drop shadow.
Select the small rock layer, effects, plugins, Eye candy 5 nature, rust on these settings...
Under the settings tab, select Medium Orange High coverage
Under Basic tab:
Feature Size 60.01
Coverage 81
Soften spots 0
Texture variation 89
Rust color dark grey
Draw water streaks NOT checked.
Seamless tile NOT checked.
Random seed 1987
click ok.
Add your drop shadow.
Copy and paste the pebbles and drag below the small rock layer, see example for placement.
Add drop shadow.
Copy and paste the grass, arange in front of the small rock and tree. Add drop shadow.
Copy and paste the twigs, add drop shadow and see example for placement.
Copy and paste your tube of choice. Resize if need be and place where you think it looks best.
Add your drop shadow. with your move tool, drag the word art up to the top right corner.
For the word art, I took the green and the brown from the kit. click on the word art and then
click on manual color replacement. Change the color to your choice.
On the word Naked, Change it to green using the manual color replacement. Effects, plugins,
eye candy 4000, glass with these settings:
Under settings tab, select glass tube. drag the bevel width until you are satisfied with it.
click ok. effects, plugins, eye candy 4000, gradient glow with these settings:
Under basic tab:
Glow width 3
Soft corners 25
Overall opacity 100
Under the color tab:
change color to the brown move a second slider half way across. Click ok.
Hide all layers except all the word art, right click in the layers palatte on one of the
word art, merge, merge visible.
Selections, select all, float, defloat, modify, expand by 5. Add a new raster layer, flood
fill with white, adjust, add noise with these settings:
Uniform checked.
Noise 68%
Monochrome checked,
Drag below the word art and add drop shadow. Unhide everything. Add your name, I used the
cream color from the kit. Add noise on these settings:
Uniform checked.
Noise 48%
Monochrome checked.
Effects, plugins, eye candy 4000 gradient glow on these settings:
Under basic tab:
Glow width 3
Soft corners 25
Overall opacity 100
Under the color tab:
change color to the brown move a second slider half way across. Click ok. Add drop shadow.
See example on where to place the name.
Crop and resize your tag. I resized mine to 500. Now add your copyright and license number if using a PTU artist. And you are done!
Thank you for following my tutorial. I would love to see what you made!
Thursday, June 10, 2010
FTU Tutorial - It's a Party!
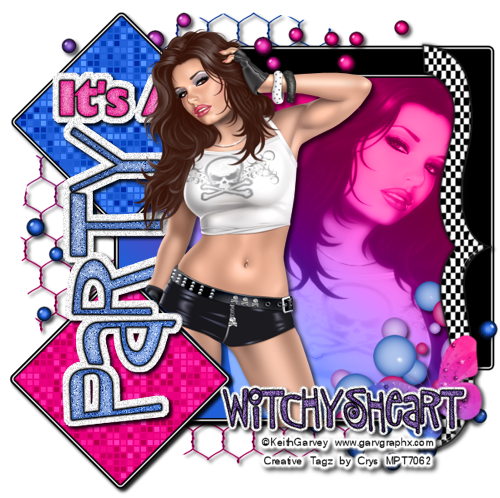 Hi Everyone! I wrote another tutorial, this time I am using my It's a Party Scrap kit! I just love the colors in it!
 For this tutorial you will need the following:
I've used a PTU tube by Keith Garvey. You can purchase his art HERE
(*Note you must have a license to use his art)
Scrap Kit: FTU It's a Party scrap kit by Crys HERE
Template by Crys HERE
Plug-ins: (Optional)
Eyecandy 4000: Gradient glow, and glass
Xero: Radiance, and fritillary
Font Used: Sniplash
♥ Let's Get started! ♥
In Psp Open the template.
For the drop shadow on evertying I am using the following settings:
Verticle: 3, Horizontal: 3, Opacity: 70, Blur: 6, color black. (you use what ever you want)
(*Resize everything before you start copy and pasting)
Open your scrap kit and select:
Balloon rainbow 2 (resize 70%)
Bracket (free rotate right 90%)
Butterfly 4 (resize 40%, free rotate left 15%)
Circle Wire
sprinkles 1 (resize 78%)
Copy and paste the circle wire, drag to the bottom adjust so you can see it on the left side.
See example for placement. Add your drop shadow.
Leave the black square, black click effects, plugins, gradient glow Using these settings:
Glow width: 5
Soft Corners: 25
Overall opacity: 100
Draw only outside selection: checked
Click on color and make the first slider white, add a second slider and make it black.
Opacity set to 100. Click ok. Add your drop shadow.
Copy and paste the sprinkles, drag it just above the bottom black square. Adjust to your liking,
duplicate, mirror, and move to the bottom right corner. See example for placement. Add you
drop shadow.
I used the pink and the blue color from the kit, by taking the dropper tool and picking up the colors
from the sprinkles. Select the large grey square, selections, select all, float, defloat,
add a new raster layer, and flood fill with a gradient from the blue and pink colors you selected.
Select none, and delete the grey square. Copy and paste the close up of the tube, (if using
the same tube that I am, then click on image, mirror then resize by 82%) Adjust it to the right
side of the square. Click on the square, selections, select all, float, defloat, invert, select
the close up tube, and click delete. Effects, xero, radiance with these settings...
Strangeness: 128
Charm: 50
Truth: 128
Beauty: 255
Click ok. On the layers palatte change the blend mode to Luminance (L) and adjust opacity to 52.
Copy and paste the balloon rainbow and adjust above the tube on the bottom right. Check the
example for placement. Add your drop shadow, then click on the square again and selections
select all, float, defloat, invert and click back on the balloons and hit delete on your
keyboard.
Back on the gradient square, effects, plugins, eyecandy 4000, gradient glow. Use these settings...
Glow width: 5
Soft Corners: 25
Overall opacity: 100
Draw only outside selection: checked
Click on color and make the first slider black, add a second slider and make it white, and
make the third slider black. Opacity set to 100. Click ok. Add your drop shadow.
Select the top diamond shape, click on manual color correction, change the diamond to the blue
color. Effects, plugins, xero, fritillary on these settings...
Granularity: 8
Aggression: 30
Tesselation: 100
Variation: 61
Now click ok, Effects, plugins, eyecandy 4000, gradient glow on these settings:
Glow width: 5
Soft Corners: 25
Overall opacity: 100
Draw only outside selection: checked
Click on color and make the first slider black, add a second slider and make it white, and
make the third slider black. Opacity set to 100. Click ok. Add your drop shadow.
Select the bottom Diamond, click on the manual color correction, change the diamond to pink,
and repeat the steps above.
Click on the words "IT's A" and click on manual color corrections and change to pink, effects,
plugins, eyecandy 4000, glass on these settings...
Click on the settins in the "glass" box and click on glass tube, on the basics tab...
Bevel Width 31.70
Smoothness 100
Inside Marquee checked
Edge Darkening 25
Gradient shading 0
Refraction 50
Opacity 80
Tinting 5
Click ok, click on adjust, add noise on these settings...
Uniform checked
Noise 36
Monochrome checked.
Effects, plugins, eyecandy 4000, gradient glow on these settings...
Glow width: 5
Soft Corners: 25
Overall opacity: 100
Draw only outside selection: checked
Click on color and make the first slider black.
Click ok.
On the word Party Follow the same steps as above only changing it to blue.
Hide everything except the wordart and merge visible. Selections, float, defloat,
modify, expand by 6. Add a new raster layer and flood fill white.
click on adjust, add noise on these settings...
Uniform checked
Noise 48
Monochrome checked.
Drag below the wordart and add your drop shadow. Unhide everything.
Copy and paste the bracket, see example for placement, copy and paste the butterfly and
arrange on top of the bracket on the bottom. Copy and paste your tube,add your drop shadow
(if using the same tube as I am then resize it by 80% and follow the next steps.)
Erase the parts of the tube that overlap the bottom diamond. To erase the tube, I select
the diamond, selections, select all, float, defloat and then erase any part of the tube
I don't want to show. Follow the same directions on the word art so the tube doesn't cover
the a in the word party. See example.
Now all that is left is to add your name and copy right info. For the name... effects,
plugins, eyecandy 4000, glass on these settings...
Click on the settins in the "glass" box and click on glass tube, on the basics tab...
Bevel Width 31.70
Smoothness 100
Inside Marquee checked
Edge Darkening 25
Gradient shading 0
Refraction 50
Opacity 80
Tinting 5
Click ok, click on adjust, add noise on these settings...
Uniform checked
Noise 36
Monochrome checked.
Effects, plugins, eyecandy 4000, gradient glow on these settings...
Glow width: 5
Soft Corners: 25
Overall opacity: 100
Draw only outside selection: checked
Click on color and make the first slider black and make the second slider white. Add your
drop shadow.
Now crop and resize your siggy. I always resize mine to 500.
Add your copyright info and license number if using a PTU tube. I always add a gradient
glow to the copyright info that way it can be used on any color of background and the copyright
will still show up.
I hope you enjoyed my tutorial! Remember tutorials are just guidelines, make it your own and
have fun with it! I would love to see what you made! So either leave me a link where I can see
it or send me an email with it! I have a slide show and would love to show it off!
Thank you and have a great day!
Tuesday, June 8, 2010
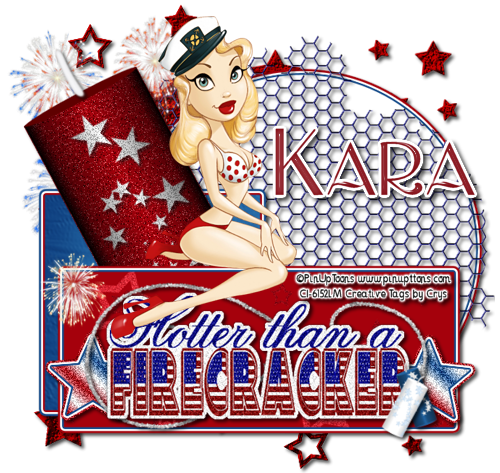
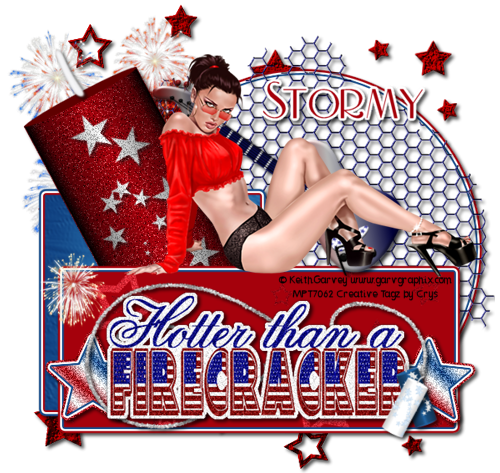
FTU tutorial - Hotter than a Firecracker
 For this tutorial you will need the following:
I've used a PTU tube by PinUp Toons. You can purchase his art HERE
(*Note you must have a license to use his art)
Scrap Kit: FTU Hotter than a Firecracker kit by Stormy and Crys HERE
Template by Crys HERE
Plug-ins: (Optional)
Eyecandy 4000: Gradient glow, and glass
Font Used: Nadall
♥ Let's Get started! ♥
In Psp Open the template. Delete the word art.
For the drop shadow on evertying I am using the following settings:
Verticle: 3, Horizontal: 3, Opacity: 70, Blur: 6, color black. (you use what ever you want)
(*Resize everything before you start copy and pasting)
Open your scrap kit and select:
Paper 6 (resize by 62%)
Paper 10 (resize by 62%)
Firecracker 2 (resize by 36% free rotate right 28%)
Firecracker 3 (resize by 36% free rotate left 20%)
Metal Stars 2
ss fireworks (resize by 22%)
ss fireworks 2 (resize by 38%)
ss glitter swirl 3 (free rotate right 15%)
ss wire 2 (resize 78% & flip)
ss wordart 2 (resize to your liking)
Copy and paste the metal stars, drag to the bottom layer. Add drop shadow. Copy and paste ss fireworks 2
adjust under the firecracker template. Select the circle layer, selections, select all,
float, defloat, add a new raster layer, flood fill with white. Selections, select none.
delete the grey circle layer. Now we are going to add the gradient glow around the circle.
This is optional, if you do not have this plug in, don't worry, you don't have to use it.
If you are going to use it... Effects, plugins, eyecandy 4000, gradient glow on these settings..
Glow Width 6.77
Soft Corners 25
Overall Opacity 100
Draw only outside selection checked
Under the color tab
using blue for the first tab, white half way out on the second slider, and red all the
way to the end. (adjust to your liking)
Click ok. Add your drop shadow.
copy and paste ss wire 2 place over the white circle layer. Adjust to where you like it,
you can use the example for placement. Add your drop shadow.
select the square behind the firecracker template, selection, select all, float, defloat, invert
copy and paste paper 10, press the delete button on your keyboard. Delete the grey square
and add your gradient glow, only change it so the blue and the red are reversed. Add drop shadow
Select the bottom layer of the firecracker template, click on manual color correction and
change it from grey to a darker red color. Adjust, add noise, on these settings...
Uniform checked
48%
monochrome checked
Click ok and add your drop shadow.
On the star layer of the firecracker, go to adjust, add noise, and use the same settings as
above, only change the % to 86%. Add your drop shadow. Click on the oval top part of the
firecracker and change it to red as you did before with the manual color changer. Select
wick, effects, plugins, eyecandy 4000, glass. Leave all the settings the as is, only click
on settings, and select glass tube adjust the width until you like it, and click ok. Add your
drop shadow to it.
Click on the rectangle layer, selections, select all, float, defloat, invert, copy and paste
paper 6 and press delete on your keyboard. Delete the grey rectangle and add your gradient glow
as before on the white circle. Add your drop shadow.
Select one of the star templates, selections, select all, float, defloat, add a new raster layer
and flood fill with a red white and blue gradient. Delete the grey layer star and add your
gradient glow to the star, same as the white circle. Add your drop shadow, now right click on
the star in the layer palatte, and duplicate it. Move it over the other star and delete that
grey template too. Copy and paste ss fireworks and move to the top left corner of the red
rectangle.
Copy and paste ss glitter swirl 3 and adjust so it sets over both stars. Add your drop shadow
Copy and paste ss wordart 2. make sure it fits over the stars, with the stars still
showing. Use the example for exact placement. Add your drop shadow.
Copy and paste both firecrackers and adjust to your liking on top of the wordart.
Add drop shadow to both. Add your Tube, if using the same one I am, then resize it by 86%.
Add your drop shadow, if using a different tube, adjust and resize accordingly. Now add your
name to it and your copyright info! Don't forget your copyright info and license number if using
a PTU tube! Resize and you are done. I resize mine to 500 wide.
This tutorial is just a guide! Have fun and add what you want to yours, if you do follow the
tutorial, please leave me a link where I can see it or email me with it! I would love to see
your work! Thank you so much!
Subscribe to:
Posts (Atom)
About Me
- Crys
- I am a SAHM of 2 very active kids and a Wife to a wonderful man. I also take care of my grandma who lives with us...so yep I am a busy girl...lol, I started out as a tagger almost 4 yrs ago and then I started making templates and writing tutorials, one day I decided I wanted to try my hand at making scrap kits...and almost 2 years later, I am still making them. I have met a lot of amazing people along the way that have helped and given me support through-out all of this. Big hugs and thanks! Well that is about it, if you want to know more...just shoot me an email!
My Scrap Blog

Snag My Blinkie
