My Visitors
Subscribe Here


Friday, May 14, 2010
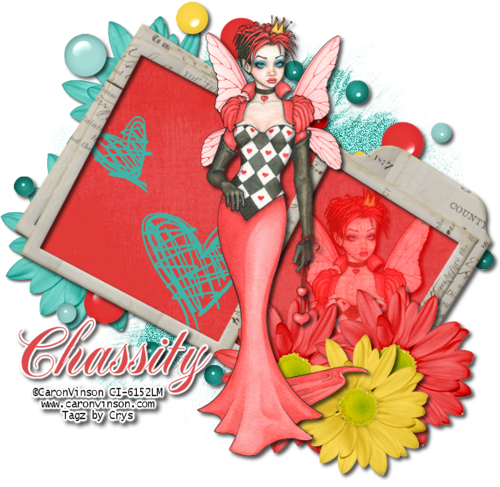
PTU Tutorial - Queen of Hearts
This tutorial is for someone with the basic knowledge of PSP
For this tutorial you will need the following:
I've used a PTU tube by Caron Vinson. You can purchase her art HERE
(*Note you must have a license to use her art)
Scrap Kit: Rain Drops Made by Chassity at PolkaDot Scraps you can find it HERE
Mask: I used mask #349 by Vix you can get it HERE
Plug-ins:
Eyecandy 4000: Gradient glow
Font Used: Notnorval HmkBold
♥ Let's Get started! ♥
In Psp Open new layer 600x600, make sure it is on 72 DPI and trasparent is checked.
For the drop shadow on evertying I am using the following settings:
Verticle: 3, Horizontal: 3, Opacity: 70, Blur: 6, color black. (you use what ever you want)
Open the scrap kit, and open the following elements, papers, and frame:
Paper #2
Paper #9
Frame #3
Element #19 (bubbles)
Element #20 (scribble hearts)
Element #46, 47, & 48 (flowers)
With the hand tool, copy and paste paper #9, Go to layers, load save mask, find your mask and apply,
merge as group. Resize 78%. Adjust, add noise with these settings:
Uniform checked, 63, MOnochrome checked.
Copy and paste the frame layer above the mask. Resize by 82%, image, free rotate
to the right by 36. Copy paper 2, paste it below the frame layer.
with the magic wand on the frame layer, click inside both the frame openings,
selections, modify, expand by 4. Selections, invert. click on paper 2 layer and hit delete.
Now you have nothing outside the frame.
Copy and paste element #19 resize by 78% arange to the left side of the frame
(see the example for placement) Duplicate, flip, and mirror. Arrange to your liking.
Copy and paste element #46 resize by 72% position under the bubble layer, duplicate readjust.
see the sample for placement.
Copy and paste element #47. Resize by 64% organize at the bottom right corner of the frame.
Duplicate and move just beside the first one.
Copy and paste element # 48, resize by 56%. position on top of the red flowers.
copy and paste scribble hearts, resize by 78%, drag below the frame layer. See the sample
for positioning.
Copy the tube and position on top, duplicate and drag below the frame layer. With the magic
wand on the frame layer, click in the box on the right, selections, modify, expand by 4.
Selections invert. Click on the tube layer (below the frame) hit delete. On the same tube
layer, effects, xero, radiance on these settings:
Strangeness 128
Charm 50
Truth 128
Beauty 112
click ok. still on the tube layer with blend mode, use Overlay.
Add your drop shadow to everything.
Now for the name. You can use what ever font you like, I used a color from the tube for the
name. On the name I used eyecandy Gradient glow on these settings:
Glow width 3
soft corners 25
overall opacity 100
Color white
add another bar and drag it half way across, click ok. Add your drop shadow.
Add your copyright and resize to your liking!
Thank you for following my tutorial! I would love to see anything you made.

Subscribe to:
Post Comments (Atom)
About Me
- Crys
- I am a SAHM of 2 very active kids and a Wife to a wonderful man. I also take care of my grandma who lives with us...so yep I am a busy girl...lol, I started out as a tagger almost 4 yrs ago and then I started making templates and writing tutorials, one day I decided I wanted to try my hand at making scrap kits...and almost 2 years later, I am still making them. I have met a lot of amazing people along the way that have helped and given me support through-out all of this. Big hugs and thanks! Well that is about it, if you want to know more...just shoot me an email!
My Scrap Blog

Snag My Blinkie

0 comments: