Welcome
My tutorials are all copyright compliant and created for those with a working knowledge of PSP. All tutorials are of my own creation and any resemblance to any other tutorial is purely coincidence. I strive to be 100% copyright compliant, so if you see something of yours on my blog that I haven't given credit for, please notify me immediately so I can give credit or take it down. Do not take my tutorials and claim them as your own or place them on another site. Direct people to my blog instead. I hope you enjoy my tutorials!
Powered by Blogger.
My Tutorials
My Visitors
Monday, September 26, 2011
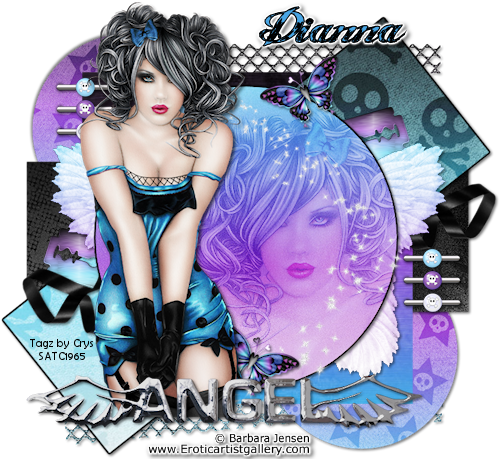
PTU Tutorial Emo Angel
For this tutorial you will need the following:
Scrap kit: PTU kit Emo Angel by Digicats (and dogs) HERE
Tube: tube of choice, I am using the beautiful art work of Barbara Jensen HERE
You must have a license number to use this tube.
Template: Emo Angel by Me HERE
Font Used: Angel Tears
Eye Candy 4000 Gradient Glow (Optional)
♥ Let's Get started! ♥
Open template, canvas size 800x800. Delete word art and copyright info.
For the drop shadow on evertying I am using the following settings:
Verticle: 2, Horizontal: 2, Opacity: 71, Blur: 6, color black. (you use what ever you want)
Remember to save as you go.
(*Resize everything before you start copy and pasting)
Paper 6 (resize 60%)
Paper 7 (resize 90%)
Paper 17 (resize 85%)
Paper 19 (resize 75%)
Paper 20 (resize 75%)
Angel Wings (Do Not resize)
butterfly 1 (resize 35%)
Glitter Trail (do not resize)
Mesh (Do Not Resize)
Razor Blade (resize 60%)
Ribbon 4 (resize 68%)
Staples (resize 54%)
Word art angel (Do Not Resize)
Tube (if using the same tube Do Not Resize)
Close up Tube (if using the same tube Do Not Resize)
You can always refer to the sample for placement of anything!
Copy and paste mesh, drag to bottom layer. Add dropshadow.
Select smaller circle to the bottom. Selections, float, defloat, invert.
Copy and paste paper 6 Hit delete. selctions, select none. Delete grey circle,
Don't forget to add your dropshadow as you go. Duplicate and position above top smaller
circle to the left, delete grey circle.
Select long horizontal rectangle, just above smaller cirlce layers, selections, select all,
float, defloat, invert. copy and paste paper 17. Hit delete, selections, select none, and
delete grey rectangle.
Select dark grey square. Follow the above directions and paste paper 20. Continue with the
above directions. select the diagonal rectangle, again following the directions above and
paste paper 7. continue with the same directions.
Select the larger top circle layer. Once again follow the above directions and paste
paper 19. Hit delete, copy and paste the close up tube, hit delete. Selections, select none
Delete grey circle layer. On the tube, I changed the blend mode to soft light. I added a
gradient glow to the large circle and diagonal rectangle. Follow the next steps if you want
to add the same gradient glow.
Effects, plugins, Eye candy 4000, gradient glow
Glow width 3
Soft corners 25
overall opacity 100
Color white, and slide another tab to the middle.
Copy and paste staples, add dropshadow, adjust to the top left side, duplicate and move to
lower right side, see sample for placement. Copy and paste the angel wings, adjust the wings
so they are centered behind the circle. Copy and paste the razor blade, position behind the
wings. Duplicate and mirror, adjust as in the sample. Copy and paste ribbon 4, using the
pick tool. rotate to the right so the ribbon is more horizontal. position to the left side,
Duplicate and mirror. Copy and paste the glitter trail. Move to the right side above the
large circle.
Copy and paste the tube. Remember to add dropshadow as you go.
Copy and paste the butterfly 1 using the pick tool, rotate to the left slightly, adjust behind
the tube a bit, duplicate and mirror, adjust to the top right of circle.
Copy and paste the word art moving above the tube to the bottom!
Crop and resize to your liking, I resized to 500. Make sure DPI is 72.
Add your name. I added a gradient glow to mine on these settings:
Effects, plugins, Eye candy 4000, gradient glow
Glow width 3
Soft corners 25
overall opacity 100
Color white, and slide another tab to the middle.
Add your dropshadow. Add your copyrights and license for the tube.
Merge visible and save! you're done! Simple and easy.
I would love to see what you made!
Thank you for following my tutorial! If you have any questions please email me at
kissnjoe@yahoo.com!
Labels:
Digicats(and dogs),
PTU Tutorials,
TKO Scraps
|
0
comments

Friday, September 23, 2011
New PTU Tut Girls Night
For this tutorial you will need the following:
Scrap kit: PTU kit Breakfast at Tiffany's by Sweet Creations Scraps HERE
Tube: tube of choice, I am using the gorgeous art work of PinUpToons HERE
You must have a license number to use his work. (mine was purchased at CILM)
Font Used: 2Peas Wedding Day
Eye Candy 4000 Gradient Glow (Optional)
Mask of choice
♥ Let's Get started! ♥
For the drop shadow on evertying I am using the following settings:
Verticle: 2, Horizontal: 2, Opacity: 71, Blur: 6, color black. (you use what ever you want)
Remember to save as you go.
(*Resize everything before you start copy and pasting)
Paper 5 (resize 73%)
Paper 7 (resize 73%)
Paper 12 (resize 94%)
Chair (resize 42%)
Champagne (resize 50%)
Champagne Glass (resize 40%)
City Scape (Resize 50%)
Film Strip (resize 70%)
Flower 2 (resize 26%)
Flower 6 (resize 26%)
Frame 3 (resize 74%)
Moon (resize 73%)
Paper Butterfly (resize 26%)
Retro Dress 1 (resize 62%)
Ribbon 1 (resize 42%)
Scattered Pettles (resize 48%)
Umbrella (resize 62%)
Tubes (if using the same tube Do not resize)
You can always refer to the sample for placement of anything!
Copy and paste paper 12, Apply your mask.
Copy and paste the frame, copy and paste paper 7, with your magic wand, select frame layerclick inside the frame, selections, invert, back on paper layer, hit delete. Selections,
select none. Add your dropshadow to the frame. Copy and paste the moon, adjust over the moon
on the paper. Copy and paste cityscape. Adjust so the longest building on the right is
almost touching the top inner part of frame. See sample. Remember to add your dropshadow as
you go. Copy and paste the chair, so the back of it is mid way up the frame. Mirror and place
on the left as in sample. Copy and paste the umbrella and place on the left side above the
mask layer. copy and paste the retro dress, using the pick tool, rotate to the right
Above the frame layer, copy and paste the champange glass and champange, using your pick
tool, rotate the bottle to the left some.
Copy and paste the film strip, with the pick tool, rotate to the left, see sample. Adjust to
the bottom of the frame. With the magic wand, click in the film strip, hold the shift key and
click in each of the boxes. Selections, invert, copy and paste paper 5. Hit delete, copy
and paste the tube of choice.and hit delete again on each tube. see sample. On the tube layer,
change the blend mode to luminance legacy. Do this for both tubes.
copy and paste ribbon 1, using the pick tool, rotate to the left so the right side is even with
top film strip frame. copy and paste flower 2, move to top left side of film strip, duplicate
the flower and position to the lower right side of film strip. Copy and paste the flower 6
and move below the film strip to the top left, duplicate and position to the lower right
corner of the film strip. copy and paste paper butterfly, using the pick tool, rotate a bit
to the left, position to the left below the champagne bottle. Duplicate and mirror
position to the right top of film strip. Copy and paste the main tube, mirror. Add your
dropshadow.
Crop and resize to your liking, I resized to 500. Make sure DPI is 72.
I added some word art. You are welcome to use the same wording:
Girls Night. And then I added a gradient glow to it on these settings:
Effects, plugins, Eye candy 4000, gradient glow
Glow width 3
Soft corners 25
overall opacity 100
Color white, and slide another tab to the middle.
Add the dropshadow to it. Now add your name. I used the same gradient glow as above on the
name. Add your dropshadow. Add your copyrights for the tube. On the mask layer, using the pick
tool, drag in the corner to make it just a bit smaller.
Merge visible and save! you're done! Simple and easy.
I would love to see what you made!
Thank you for following my tutorial! If you have any questions please email me at
kissnjoe@yahoo.com!
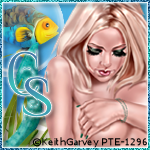
Here is another version I did using the stunning art work of Keith Garvey!
Labels:
PTU Tutorials,
Sweet Cravings Scraps,
TKO Scraps
|
0
comments

Wednesday, September 21, 2011
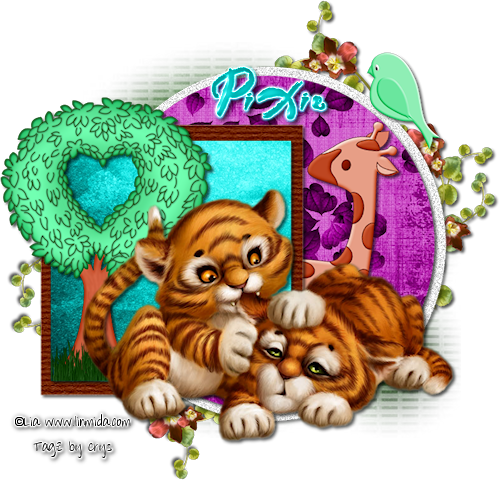
PTU Tut In The Wild
For this tutorial you will need the following:
Scrap kit: PTU kit Woodland Ball by Kissed by Pix HERE
Tube: tube of choice, I am using the gorgeous art work of Lia
Template: Spoiled by Me HERE
Font Used: Rainforest
Eye Candy 4000 Gradient Glow (Optional)
Filters Unlimited (Optional)
Filters Unlimited (Optional)
Mask of choice
♥ Let's Get started! ♥
Open template, canvas size 750x750. Delete word art, copyright and the wavy lines.
For the drop shadow on evertying I am using the following settings:
Verticle: 2, Horizontal: 2, Opacity: 71, Blur: 6, color black. (you use what ever you want)
Remember to save as you go.
(*Resize everything before you start copy and pasting)
Paper 1 (resize 70%)
Paper 5 (resize 70%)
Leaf paper 6 (resize 70%)
Bird 3 (resize 30%)
Giraffe (do not resize)
Grass (do not resize)
Heart Tree (Do Not Resize)
Vine (resize 88%)
Tube (if using the same tube resize 90%)
You can always refer to the sample for placement of anything!
Copy and paste paper 1, Apply your mask.
On large circle change color to white, adjust, add noise, at 74%, uniform and monochrome
checked. Resize circle 90%.
Select smaller circle. Selections, float, defloat, invert. Copy and paste leaf paper
6. Hit delete. selctions, select none. Delete grey circle, Don't forget to add your dropshadow as you go.
On the large square, change color to one from your tube, I used a brown/red color. Now you can
leave it as it is and add dropshadow to it, or you can use the filters unlimited plugin to
give it a wood like effect. If you want same effect, follow the next step:
Effect, plugins, filters unlimited, Paper textures, structure paper one, leave settings and
click apply. Add dropshadow.
select the smaller square, selections, float, defloat, invert. copy and paste paper 5, hit
delete, copy and paste grass and adjust in the smaller square, hit delete to remove excess
grass, Selections, select none, delete small grey square.
Copy and paste heart tree, adjust below the grass, using your eraser, and erase the roots.
copy and paste the giraffe, use your pick tool and slightly rotate to the right. Drag it below
the larger circle layer.
Copy and paste the vine, mirror and flip, adjust to the right top corner, under the large
circle. Duplicate, mirror and flip, move to bottom left corner.
Copy and paste the tube. Don't forget your dropshadow.
Crop and resize to your liking, I resized to 500. Make sure DPI is 72.
Add your name. I added a gradient glow to mine on these settings:
Effects, plugins, Eye candy 4000, gradient glow
Glow width 3
Soft corners 25
overall opacity 100
Color white, and slide another tab to the middle.
Add your dropshadow. Add your copyrights for the tube.
Merge visible and save! you're done! Simple and easy.
I would love to see what you made!
Thank you for following my tutorial! If you have any questions please email me at
kissnjoe@yahoo.com!
Labels:
Kissed by Pix,
PTU Tutorials
|
0
comments

Sunday, September 18, 2011
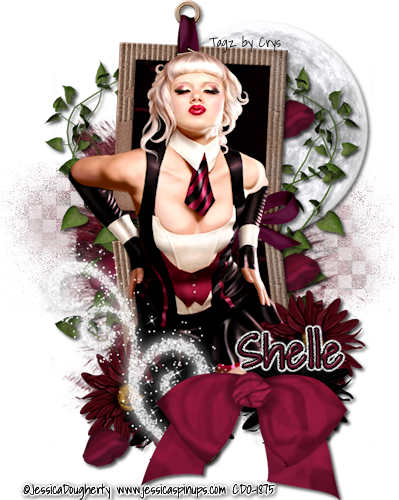
PTU Tut Love Me
For this tutorial you will need the following:
Scrap kit: PTU kit Love Hurts by Shellez Creations HERE
Tube: tube of choice, I am using the gorgeous art work of Jessica Dougherty HERE
You must have a license to use her work
You must have a license to use her work
Font Used: Shadows into light
Eye Candy 4000 Gradient Glow (Optional)
Mask of choice
♥ Let's Get started! ♥
Open new image, 700x700
For the drop shadow on evertying I am using the following settings:
Verticle: 2, Horizontal: 2, Opacity: 71, Blur: 6, color black. (you use what ever you want)
Remember to save as you go.
(*Resize everything before you start copy and pasting)
Paper 2 (resize 75%)
Paper 6 (resize 65%)
Element 1 (resize 14%) flower petal
Element 3 (resize 46%) bow
Element 24 (resize 75%) sparkles
Element 25 (resize 68%) moon
Element 26 (Do Not Resize) vine
Element 29 (resize 30%) red flower
Element 30 (resize 30%) black flower
Element 34 (resize 50%) Frame
Tube (if using the same tube resize 88%)
You can always refer to the sample for placement of anything!
Copy and paste paper 2, Apply your mask.
copy and paste element 34, with magic wand, click inside both frame openings, selections, invert
copy and paste paper 6 hit delete. copy and paste element 25, adjust to above the mask
layer and to the upper right corner of the frame.
copy and paste element 26. See sample for placement, duplicate and mirror. Don't forget to
add your dropshadow as you go.
Copy and paste the tube, mirror and drag below the frame. Duplicate and drag above the frame.
Erase part of the legs on top tube layer to make her appear below the frame at the bottom.
Add your dropshadow to the bottom tube layer. copy and paste element 29. Adjust to lower
left corner of the frame. Duplicate and move to the right side. copy and paste element 30.
adjust above red flower on the left. Duplicate and move to the right above the red flower.
Copy and paste element 24. Using the pick tool, rotate some to the right. Copy and paste
element 3. Move to lower right corner of frame above the flowers.
Back on the sparkles layer, erase the bottom part showing under the bow. Duplicate 2 times.
on the bottom layer, add the dropshadow. Copy and paste element 1. Duplicate and arrange,
see sample for placement.
Crop and resize to your liking, I resized to 500. Make sure DPI is 72.
Add your name. I added a gradient glow to mine on these settings:
Effects, plugins, Eye candy 4000, gradient glow
Glow width 3
Soft corners 25
overall opacity 100
Color black, and slide another tab to the middle.
Add your dropshadow. Add your copyrights for the tube.
Merge visible and save! you're done! Simple and easy.
I would love to see what you made!
Thank you for following my tutorial! If you have any questions please email me at
kissnjoe@yahoo.com!
Labels:
PTU Tutorials,
TKO Scraps
|
0
comments

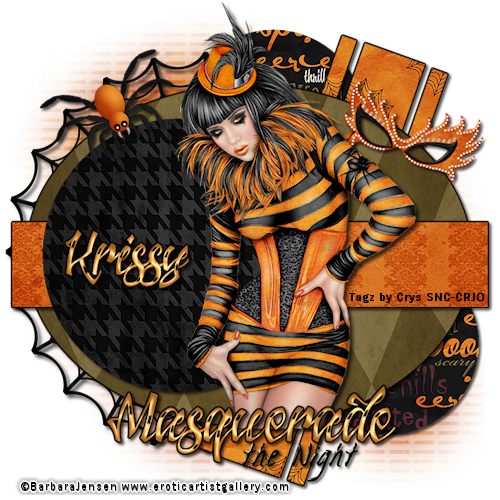
PTU Tut Masquerade
For this tutorial you will need the following:
Scrap kit: PTU kit Halloweeny by Krissy's Scraps HERE
Template: Make a Choice by Me HERE
Tube: tube of choice, I am using the gorgeous art work of Barbara Jensen HERE
You must have a license to use her work this tube was purchased at Scraps N Crap
Font Used: Jacked Eleven Highlight
Eye Candy 4000 Gradient Glow (Optional)
Mask of choice
♥ Let's Get started! ♥
Open template, image, canvas size 750x750
For the drop shadow on evertying I am using the following settings:
Verticle: 2, Horizontal: 2, Opacity: 71, Blur: 6, color black. (you use what ever you want)
Remember to save as you go.
(*Resize everything before you start copy and pasting)
Paper 6 (resize 75%)
Paper 7 (resize 93%)
Paper 8 (resize 89%)
Paper 10 (resize 66%)
Paper 12 (resize 89%)
Cobweb 1 (Do Not resize)
Masquerade mask 2 (Do Not Resize)
Spider 2 (resize 54%)
Tube (if using the same tube Do Not resize)
You can always refer to the sample for placement of anything!
Delete the copyright and word art
Copy and paste paper 7, duplicate and hide the top paper, drag the other paper to bottom
layer and apply your mask.
Unhide other paper, drag to above long rectangle, selections, float, defloat, invert and select
paper, hit delete. Delete the rectangle template.
On bottom upper small circle, selections, float, defloat, invert and copy and paste paper 10
hit delete. Add dropshadow and duplicate, adjust to bottom right above the other small circle
now delete both grey circles. Dodn't forget to add your dropshadow as you go.
select the diagonal 3 rectangels, selections, float, defloat, invert, copy and paste paper 12
hit delete. I added a gradient glow to them, it is optional and looks fine with out it, but
if you would like to do it to then follow the next steps, if not then skip.
Effects, plugins, Eye candy 4000, gradient glow
Glow width 3
Soft corners 25
overall opacity 100
Color black, and slide another tab to the middle.
Select the oval, selections, float, defloat, invert, copy and paste paper 8, and hit delete.
I also added the same gradient glow to the oval as above.
Select the small circle on top, selections, float defloat, invert, copy and paste paper 6
Now copy and paste the cobweb, drag it to the bottom layer and adjust to the left side, see
sample for placement.
copy and paste the mask, using the pick tool, turn in to the right just a bit. Adjust above
the long rectangle to the top right.
copy and paste the spider and using the pick tool, adjust to the right, and place to the top
left corner. copy and paste the tube and position to the right of the black circle.
Add your dropshadow.
Now I added word art, you are welcome make the same one. I added the inner bevel effect to it
if you would like to do the same, follow the next step.
Effects, 3D Effects, inner bevel on these settings:
Width 1, Smoothness 64, Depth 16, Ambience -27, Shininess 46, Angle 135, Intensity 30
Elevation 88, using white. Then I added the same gradient glow above.
Crop and resize to your liking, I resized to 500. Make sure DPI is 72.
Add your name. I added the same inner bevel and gradient glow to the name as above.
Add your dropshadow. Add your copyrights for the tube.
Merge visible and save! you're done! Simple and easy.
I would love to see what you made!
Thank you for following my tutorial! If you have any questions please email me at
kissnjoe@yahoo.com!
Labels:
PTU Tutorials,
TKO Scraps
|
0
comments

Subscribe to:
Posts (Atom)
.
About Me
- Crys
- I am a SAHM of 2 very active kids and a Wife to a wonderful man. I also take care of my grandma who lives with us...so yep I am a busy girl...lol, I started out as a tagger almost 4 yrs ago and then I started making templates and writing tutorials, one day I decided I wanted to try my hand at making scrap kits...and almost 2 years later, I am still making them. I have met a lot of amazing people along the way that have helped and given me support through-out all of this. Big hugs and thanks! Well that is about it, if you want to know more...just shoot me an email!
Labels
- Barbara Jensen (1)
- Bibi Collection (1)
- Caron Vinson (1)
- Creative Scraps by Crys (6)
- Digicats(and dogs) (4)
- Easter (1)
- Ed Mironiuk (1)
- Elias (4)
- FTU Tutorials (7)
- Halloween (1)
- Jennifer Janesko (1)
- Keith Garvey (3)
- Kissed by Cari (1)
- Kissed by Pix (6)
- Lady Mishka (1)
- No Scraps Tutorial (1)
- Pics For Design (3)
- PinUp Toons (4)
- PspGirl (1)
- PTU Tutorials (56)
- S.G Rowe Designs (1)
- ScrappinDollars (6)
- Sleek N Sassy (6)
- Soxsational Scraps (1)
- Suzanne Woolcott (1)
- Sweet Cravings Scraps (6)
- TKO Scraps (12)
- Wicked Creation Scrapz (2)
- Zlata_M (2)
My Friends
Email Me
Send your results from my tutorials and I'll post them on my blog. I'd love to see what you make! Just send them to me at the link below and I'll get them posted.
creativescrapsbycrys@yahoo.com


