My Visitors
Subscribe Here


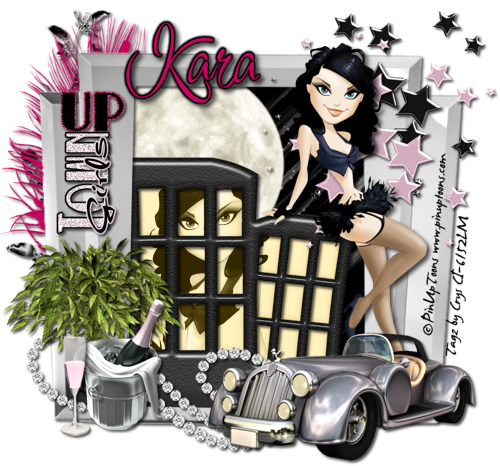
New PTU Tut - Uptown Girls

For this tutorial you will need the following:
Scrap Kit: PTU Uptown Girls by Me HERE
Tube: The Fabulous Art work by Ismael Rac HERE
(*Note you need a license number to use his work)
Word Art Supplied HERE
Plug-ins: (Optional)
Eyecandy 4000: Gradient glow, and glass
Font Used: Inspiration
♥ Let's Get started! ♥
In Psp Open new layer 800x800 transparent checked.
For the drop shadow on evertying I am using the following settings:
Verticle: 3, Horizontal: 3, Opacity: 70, Blur: 6, color black. (you use what ever you want)
(*Resize everything before you start copy and pasting)
Open your scrap kit and select:
Paper 5 (resize by 86%)
Paper 12 (resize by 86%)
frame 1 (resize by 120%)
Branch (free rotate by 40%)
Building (resize by 64%)
Car 2 (resize 72%)
Diamond accent 2
Feather 4
Ice bucket 2 (resize 46%)
Moon (resize 82%)
Plant (resize 64%)
Stars 2 & 4 (resize by 82%)
Wine glass (resize by 46%)
You can always refer to the sample for placement of anything!
We are going to start with the frame. So copy and paste your frame to the new layer. It
should be in the middle. With your magic wand tool, click inside the frame, selections,
modify, expand by 6. Selections, invert. Now copy and paste paper 12 and drag it below your
frame. Hit delete on the keyboard.
Copy and paste the branch, add dropshadow, adjust it below the frame, copy and paste the feather in front of
the branch, add dropshadow See example for placement.
Copy the moon and place it below the frame layer and adjust to the left top corner. Erase any
part of the moon that is seen on the outside of the frame (if any), add dropshadow.
Copy and paste the building and arrange to the lower left side behind the frame. with your magic wand tool, click inside each window. (to allow each window to be selected hold down shift each
time you click in a window) Selections, modify, expand by 6, selections, and invert. Copy and
paste paper 5 drag below the building and hit delete on the keyboard. With your selected tube
before copy and pasting, image, mirror, then copy and paste below the building above the paper
layer. Hit delete on the keyboard, now your tube should only show through the windows. Here you can either leave the paper the color it is or you can add a yellow tint to it. I added a yellow
tint to mine. select the paper layer click on manual color correction and change it to a yellow
hue. Back on the tube, change the blend mode to Luminance (L). Still on the tube layer, effects
plug-ins, xero, radiance on these settings:
Strangeness 128
Charm 50
Truth 128
Beauty 155
Click ok. This step is optional, you do not have to use plugins. Add dropshadow to the building.
Copy and paste the black stars. Move to the top right corner above the frame layer.
I erased the smallest stars so it fit right. Add dropshadow. Copy and paste
the pink stars and move to the top right and do the same thing with erasing the stars. Add
dropshadow. (see sample for placements).
Copy and paste the tube. I used xero radiance on it as well. This is Optional also. Use the
following settings for radiance:
Strangeness 128
Charm 50
Truth 128
Beauty 155
Click ok. Add dropshadow. Now you just have to copy and paste the rest of the elements as I did
My tutorials are just a guideline to follow, make your tag how you like it. You can use what
ever elements you would like. If you are following my sample. Then you would copy and paste
the car above the tube. Add dropshadow. Copy and paste the plant to the left bottom side
above the frame. Add dropshadow. Copy and paste the ice bucket and the wine glass. Add
dropshadow to both and arrange in front of the plant, (see sample for placement). Copy and
place the diamond accent below the car and plant. Add dropshadow. Add your dropshadow to the frame also. In my supplies I have the word art. If using the word art, then copy and paste
the word art and arrange to your liking. Add your dropshadow.
Using what ever font you choose, add your name. I used the darker pink color from the feather.
If you would like the black line around the name like mine, then add a gradient glow. Effects,
plugins, eyecandy 4000, gradient glow on these settings:
under Basic tab
Glow Width 3.09
Soft Corners 25
Overall opacity 100
Under color tab
Black for the color
move an addition slider to 1/4 of the way down the bar. Click ok, add dropshadow.
Crop and resize. I resized mine to 500. Add your copyright and license number if using a PTU tube. Save and you are done! Simple and easy. I would love to see what you made!
Thank you for following my tutorial! If you have any questions please email me at
kissnjoe@yahoo.com!
Here is a version using a PinUp Toon...

New PTU Tut - Wicked Ways
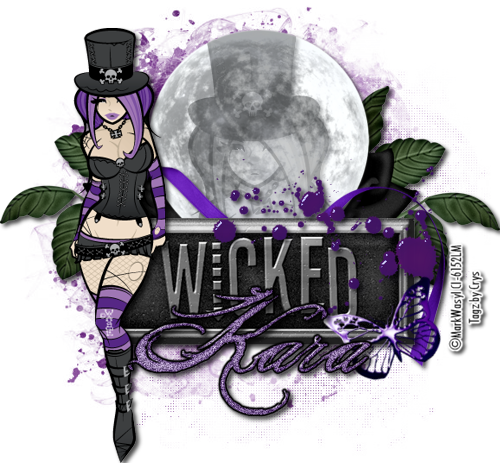 For this tutorial you will need the following:
Scrap Kit: PTU Wicked Ways by Kara @ Sweet Cravings Scraps HERE
Tube: The Fabulous Art work by Mark Wasyl HERE
(*note- you must have a license number to use his work)
Mask: Vix mask #400 HERE
Plug-ins: (Optional)
Eyecandy 4000: Gradient glow
Font Used: Free font The King and Queen Font
♥ Let's Get started! ♥
In Psp Open new layer 600x600 transparent checked.
For the drop shadow on evertying I am using the following settings:
Verticle: 3, Horizontal: 3, Opacity: 70, Blur: 6, color black. (you use what ever you want)
(*Resize everything before you start copy and pasting)
Open your scrap kit and select:
Paper 19 (resize by 86%)
Metal Butterfly 3 (resize by 22% & free rotate left 22%)
Metal Plate Word Art (resize by 72%)
Moon (resize by 56%)
Paint splatter 2
Rose 5 (resize 46%)
Satin ribbon curl 4 (resize 46% & flip)
You can always refer to the sample for placement of anything!
Copy and paste paper, Layers, Load Saved Mask, Mask from disk, choose the mask you wish
to use. Click ok and in the layer pallatte, right click on paper and merge group.
Copy the moon and paste. Move closer to the top. Still on the moon layer selections, float,
defloat, invert. Copy and paste the larger version of your tube and arrange to where you
like it, hit delete on the keyboard. Change blend mode to Luminance (L) and drop Opacity to
36%. Copy and paste Metal plate word art and adjust to the bottom of the moon, but make sure
it is above the moon layer. (on top of the moon) See the sample for placement. Add dropshadow.
Copy and paste the rose. Drag it below the moon layer, and position to the right side as shown
on the sample. Duplicate it and mirror it. Place it on the left side. Add your dropshadow.
Copy and paste the ribbon, drag below the metal plate word art. Add dropshadow. Copy and paste
the paint splatter. Postition to the top right side of the metal plate word art, allowing some
to overlap onto the moon. Add dropshadow. Copy and paste the butterfly, position on the
bottom right side on top of the metal plate. Add drop shadow. Copy and paste the tube and
move to the left side of the tag. Resize to fit. I did not have to resize mine. Add your
dropshadow. The font I used is a free font, but you can use what ever font for the name.
I selected a purple from the tube. I also added Noise to mine, this is optional, but if you
want to use noise, adjust, add noise, then use these settings:
Uniform checked
Monochrome checked
54%
I then added a gradient glow. Again this is optional. Effects, Plugins, Eyecandy 4000,
Gradient glow on these settings:
Under the Basic tab:
Glow Width 3.00
Soft Corners 25
Overall Opacity 100
Draw only outside section checked
Under the color tab:
color black and move a second slider about half way down the bar.
Click ok. Add your dropshadow.
Crop and resize. I resized mine to 500. Add your copyright. Don't forget license info if using a PTU tube. Save and you are done! Simple and easy. I would love to see what you made!
Thank you for following my tutorial! If you have any questions please email me at
kissnjoe@yahoo.com!
About Me
- Crys
- I am a SAHM of 2 very active kids and a Wife to a wonderful man. I also take care of my grandma who lives with us...so yep I am a busy girl...lol, I started out as a tagger almost 4 yrs ago and then I started making templates and writing tutorials, one day I decided I wanted to try my hand at making scrap kits...and almost 2 years later, I am still making them. I have met a lot of amazing people along the way that have helped and given me support through-out all of this. Big hugs and thanks! Well that is about it, if you want to know more...just shoot me an email!
My Scrap Blog

Snag My Blinkie
