Welcome
My tutorials are all copyright compliant and created for those with a working knowledge of PSP. All tutorials are of my own creation and any resemblance to any other tutorial is purely coincidence. I strive to be 100% copyright compliant, so if you see something of yours on my blog that I haven't given credit for, please notify me immediately so I can give credit or take it down. Do not take my tutorials and claim them as your own or place them on another site. Direct people to my blog instead. I hope you enjoy my tutorials!
Powered by Blogger.
My Tutorials
My Visitors
Saturday, October 2, 2010
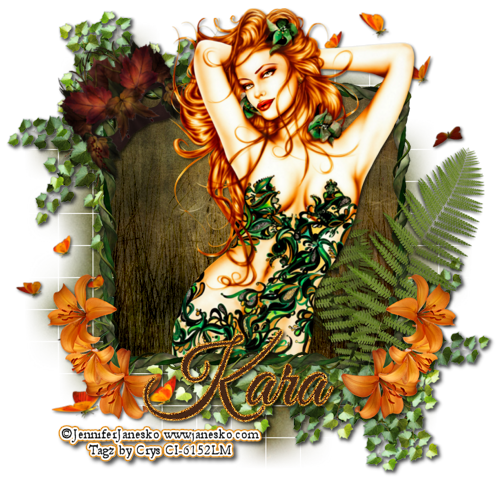
PTU Tutorial ~ Welcome to the Jungle
Scrap kit: PTU kit Welcome to the Jungle by Kara at Sweet Cravings Scraps HERE
Tube: The Fabulous Art work by Jennifer Janesko HERE
You must have a license to use her work
Plug-ins:
Eye candy 4000: Gradient glow
Font Used: FTU font Landliebe
Mask used: WSL #84 HERE
♥ Let's Get started! ♥
Open a new raster layer 750x750
For the drop shadow on evertying I am using the following settings:
Verticle: 3, Horizontal: 3, Opacity: 70, Blur: 6, color black. (you use what ever you want)
(*Resize everything before you start copy and pasting)
Paper 15 (resize 86%)
Paper 16 (resize 58%)
Frame 9 (resize 62%)
Butterfly swarm (resize 66%)
Fern (resize 44%)
Flower 5 (resize 48%)
Leaf pile (resize 80%)
Mask (resize 36%, rotate 34%)
Tall grass
You can always refer to the sample for placement of anything!
Copy and paste paper 15, layers, load/save mask, load mask from disc, select mask and apply.
Copy and paste frame 9. Copy and paste paper 16. Drag it below the frame. Copy and paste
tall grass and position above the paper. With the magic wand tool, click inside the frame.
Selections, modify, modify by 5, invert. On the tall grass layer click delete on the keyboard.
Select the paper layer and hit delete again. On the grass layer, in the layer palatte,
change blend mode to burn and lower opacity to 26.
Copy and paste the leaf pile. Drag under the paper 16 layer, adjust to the top left corner
of the frame. Add dropshadow. Duplicate and drag to lower right corner. (see sample for placement)
Copy and paste the butterfly swarm and drag below paper 16, just above the leaf pile layer.
Adjust to your liking at the lower left corner. Add dropshadow, and duplicate. Drag to top
right corner.
Copy and paste the mask and fern adding your dropshadows. Position to your liking. Again you
can use the sample for placement.
Copy and paste the flower 5, place on the left side at the bottom above the frame layer. Add
dropshadow and duplicate. Mirror and position on the other side. Erase the stem from both
flowers.
Now it is time to add the tube. If using the same tube as I am, no need to resize, but if not
resize as necessary. Adjust the tube above the flower layer. Duplicate and drag one of the
tubes below the frame layer. With the magic wand tool, clickinside the frame, selections,
modify by 5, invert, select the tube that is below the frame layer and hit delete on the
keyboard. On the top tube layer, add dropshadow and erase any part of the tube at the bottom
that is outside the frame layer. This will make the tube appear to be inside the bottom of the
frame but above the frame at the top. See sample for example. Add your dropshadow to the
frame layer.
now you add your name. If you want it to be like the sample, then you need to follow the next
step to add a gradient glow. If not, then skip to the resizing part.
Effects, plug ins, Eye candy 4000, gradient glow.
Now add your gradient glow on these settings:
Glow width 3.00
Soft Corners 25
Overall Opacity 100
Draw only outside selection checked.
Under color tab, use a color from the flower for gradient glow. Drag one slider half way across the bar.
Click ok. Add your dropshadow.
Re-sizing the siggy...
I resized mine to 500 pixels. Add your copyright.
Save and you are done! Simple and easy.
I would love to see what you made!
Thank you for following my tutorial! If you have any questions please email me at
kissnjoe@yahoo.com!
Labels:
PTU Tutorials

Subscribe to:
Post Comments (Atom)
.
About Me

- Crys
- I am a SAHM of 2 very active kids and a Wife to a wonderful man. I also take care of my grandma who lives with us...so yep I am a busy girl...lol, I started out as a tagger almost 4 yrs ago and then I started making templates and writing tutorials, one day I decided I wanted to try my hand at making scrap kits...and almost 2 years later, I am still making them. I have met a lot of amazing people along the way that have helped and given me support through-out all of this. Big hugs and thanks! Well that is about it, if you want to know more...just shoot me an email!
Labels
- Barbara Jensen (1)
- Bibi Collection (1)
- Caron Vinson (1)
- Creative Scraps by Crys (6)
- Digicats(and dogs) (4)
- Easter (1)
- Ed Mironiuk (1)
- Elias (4)
- FTU Tutorials (7)
- Halloween (1)
- Jennifer Janesko (1)
- Keith Garvey (3)
- Kissed by Cari (1)
- Kissed by Pix (6)
- Lady Mishka (1)
- No Scraps Tutorial (1)
- Pics For Design (3)
- PinUp Toons (4)
- PspGirl (1)
- PTU Tutorials (56)
- S.G Rowe Designs (1)
- ScrappinDollars (6)
- Sleek N Sassy (6)
- Soxsational Scraps (1)
- Suzanne Woolcott (1)
- Sweet Cravings Scraps (6)
- TKO Scraps (12)
- Wicked Creation Scrapz (2)
- Zlata_M (2)
My Friends
Email Me
Send your results from my tutorials and I'll post them on my blog. I'd love to see what you make! Just send them to me at the link below and I'll get them posted.
creativescrapsbycrys@yahoo.com


0 comments: