My Visitors
Subscribe Here


Tuesday, June 15, 2010
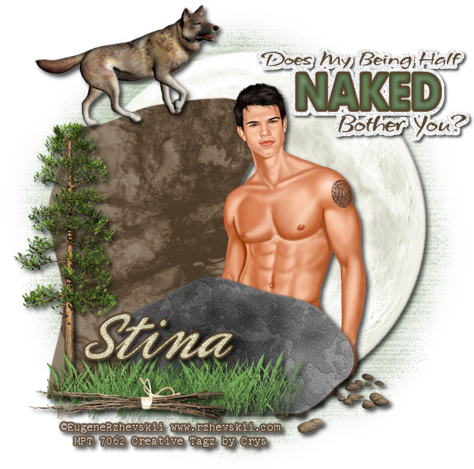
FTU Tut...Jacob's Desire
The Eclipse of the Heart Blog train has left the station! There are Amazing designers who participated! So don't forget to jump aboard the train and get all the amazing kits! Here is a tutorial with my FTU kit from the blog train...
 For this tutorial you will need the following:
I've used a PTU tube by Eugene Rzhevskii. You can purchase his art HERE
(*Note you must have a license to use his art)
Scrap Kit and Template: FTU Souls Desire (Eclipse of the Heart Blog train) by Crys HERE
Mask 119 by Weescotslass HERE
Plug-ins: (Optional)
Eyecandy 4000: Gradient glow, and glass
Eyecandy 5 rust
♥ Let's Get started! ♥
In Psp Open the template. Image, canvas size, change to 800. Click ok.
For the drop shadow on evertying I am using the following settings:
Verticle: 3, Horizontal: 3, Opacity: 70, Blur: 6, color black. (you use what ever you want)
(*Resize everything before you start copy and pasting)
Open your scrap kit and select:
Paper 1
Paper 8 (resize by 90%)
Grass
Moon 2 (resize 120%)
Pebbles
Pine Tree 2
Twigs (resize 78%)
Wolf 2 (resize 68% free rotate left 10%)
Copy and paste paper 1 and drag below the template to the bottom layer, Layers, load saved mask,
apply mask. Drop opacity to 53%.
Copy and paste the moon over the circle layer, Add drop shadow to the moon.
Delete the circle layer.
Select the cliff layer and selections, select all, float, defloat, invert, copy and paste
paper 8. Hit delete on the keyboard. Selections, select none. Delete the cliff template.
Add drop shadow to the cliff.
Copy and paste the wolf, arrange at the top of the cliff. Add drop shadow.
Copy and paste the tree, see example for placement. Add drop shadow.
Select the small rock layer, effects, plugins, Eye candy 5 nature, rust on these settings...
Under the settings tab, select Medium Orange High coverage
Under Basic tab:
Feature Size 60.01
Coverage 81
Soften spots 0
Texture variation 89
Rust color dark grey
Draw water streaks NOT checked.
Seamless tile NOT checked.
Random seed 1987
click ok.
Add your drop shadow.
Copy and paste the pebbles and drag below the small rock layer, see example for placement.
Add drop shadow.
Copy and paste the grass, arange in front of the small rock and tree. Add drop shadow.
Copy and paste the twigs, add drop shadow and see example for placement.
Copy and paste your tube of choice. Resize if need be and place where you think it looks best.
Add your drop shadow. with your move tool, drag the word art up to the top right corner.
For the word art, I took the green and the brown from the kit. click on the word art and then
click on manual color replacement. Change the color to your choice.
On the word Naked, Change it to green using the manual color replacement. Effects, plugins,
eye candy 4000, glass with these settings:
Under settings tab, select glass tube. drag the bevel width until you are satisfied with it.
click ok. effects, plugins, eye candy 4000, gradient glow with these settings:
Under basic tab:
Glow width 3
Soft corners 25
Overall opacity 100
Under the color tab:
change color to the brown move a second slider half way across. Click ok.
Hide all layers except all the word art, right click in the layers palatte on one of the
word art, merge, merge visible.
Selections, select all, float, defloat, modify, expand by 5. Add a new raster layer, flood
fill with white, adjust, add noise with these settings:
Uniform checked.
Noise 68%
Monochrome checked,
Drag below the word art and add drop shadow. Unhide everything. Add your name, I used the
cream color from the kit. Add noise on these settings:
Uniform checked.
Noise 48%
Monochrome checked.
Effects, plugins, eye candy 4000 gradient glow on these settings:
Under basic tab:
Glow width 3
Soft corners 25
Overall opacity 100
Under the color tab:
change color to the brown move a second slider half way across. Click ok. Add drop shadow.
See example on where to place the name.
Crop and resize your tag. I resized mine to 500. Now add your copyright and license number if using a PTU artist. And you are done!
Thank you for following my tutorial. I would love to see what you made!
For this tutorial you will need the following:I've used a PTU tube by Eugene Rzhevskii. You can purchase his art HERE
(*Note you must have a license to use his art)
Scrap Kit and Template: FTU Souls Desire (Eclipse of the Heart Blog train) by Crys HERE
Mask 119 by Weescotslass HERE
Plug-ins: (Optional)
Eyecandy 4000: Gradient glow, and glass
Eyecandy 5 rust
♥ Let's Get started! ♥
In Psp Open the template. Image, canvas size, change to 800. Click ok.
For the drop shadow on evertying I am using the following settings:
Verticle: 3, Horizontal: 3, Opacity: 70, Blur: 6, color black. (you use what ever you want)
(*Resize everything before you start copy and pasting)
Open your scrap kit and select:
Paper 1
Paper 8 (resize by 90%)
Grass
Moon 2 (resize 120%)
Pebbles
Pine Tree 2
Twigs (resize 78%)
Wolf 2 (resize 68% free rotate left 10%)
Copy and paste paper 1 and drag below the template to the bottom layer, Layers, load saved mask,
apply mask. Drop opacity to 53%.
Copy and paste the moon over the circle layer, Add drop shadow to the moon.
Delete the circle layer.
Select the cliff layer and selections, select all, float, defloat, invert, copy and paste
paper 8. Hit delete on the keyboard. Selections, select none. Delete the cliff template.
Add drop shadow to the cliff.
Copy and paste the wolf, arrange at the top of the cliff. Add drop shadow.
Copy and paste the tree, see example for placement. Add drop shadow.
Select the small rock layer, effects, plugins, Eye candy 5 nature, rust on these settings...
Under the settings tab, select Medium Orange High coverage
Under Basic tab:
Feature Size 60.01
Coverage 81
Soften spots 0
Texture variation 89
Rust color dark grey
Draw water streaks NOT checked.
Seamless tile NOT checked.
Random seed 1987
click ok.
Add your drop shadow.
Copy and paste the pebbles and drag below the small rock layer, see example for placement.
Add drop shadow.
Copy and paste the grass, arange in front of the small rock and tree. Add drop shadow.
Copy and paste the twigs, add drop shadow and see example for placement.
Copy and paste your tube of choice. Resize if need be and place where you think it looks best.
Add your drop shadow. with your move tool, drag the word art up to the top right corner.
For the word art, I took the green and the brown from the kit. click on the word art and then
click on manual color replacement. Change the color to your choice.
On the word Naked, Change it to green using the manual color replacement. Effects, plugins,
eye candy 4000, glass with these settings:
Under settings tab, select glass tube. drag the bevel width until you are satisfied with it.
click ok. effects, plugins, eye candy 4000, gradient glow with these settings:
Under basic tab:
Glow width 3
Soft corners 25
Overall opacity 100
Under the color tab:
change color to the brown move a second slider half way across. Click ok.
Hide all layers except all the word art, right click in the layers palatte on one of the
word art, merge, merge visible.
Selections, select all, float, defloat, modify, expand by 5. Add a new raster layer, flood
fill with white, adjust, add noise with these settings:
Uniform checked.
Noise 68%
Monochrome checked,
Drag below the word art and add drop shadow. Unhide everything. Add your name, I used the
cream color from the kit. Add noise on these settings:
Uniform checked.
Noise 48%
Monochrome checked.
Effects, plugins, eye candy 4000 gradient glow on these settings:
Under basic tab:
Glow width 3
Soft corners 25
Overall opacity 100
Under the color tab:
change color to the brown move a second slider half way across. Click ok. Add drop shadow.
See example on where to place the name.
Crop and resize your tag. I resized mine to 500. Now add your copyright and license number if using a PTU artist. And you are done!
Thank you for following my tutorial. I would love to see what you made!

Subscribe to:
Post Comments (Atom)
About Me
- Crys
- I am a SAHM of 2 very active kids and a Wife to a wonderful man. I also take care of my grandma who lives with us...so yep I am a busy girl...lol, I started out as a tagger almost 4 yrs ago and then I started making templates and writing tutorials, one day I decided I wanted to try my hand at making scrap kits...and almost 2 years later, I am still making them. I have met a lot of amazing people along the way that have helped and given me support through-out all of this. Big hugs and thanks! Well that is about it, if you want to know more...just shoot me an email!
My Scrap Blog

Snag My Blinkie

0 comments: